Read Time 15 mins | Written by: Attribuly
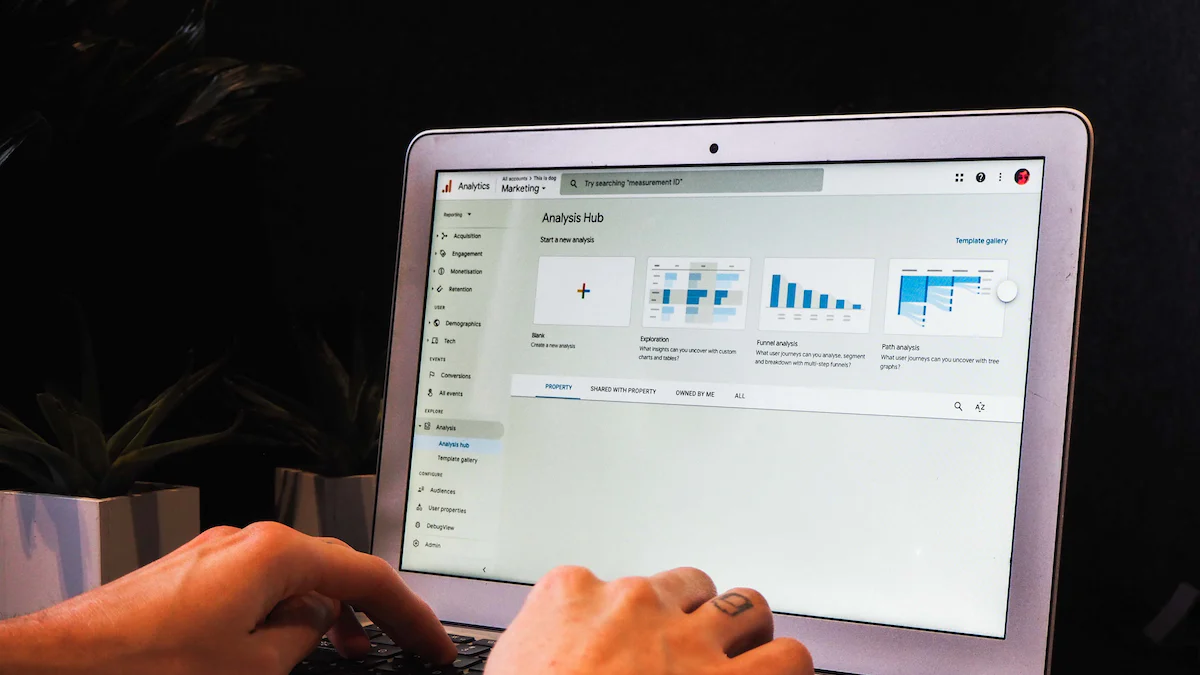
Introduction to Google Ads Conversion Tracking
Google Ads conversion tracking is a vital tool for any Shopify store owner or marketer looking to optimize their advertising campaigns and boost their return on investment (ROI). By implementing conversion tracking, you can gain valuable insights into the effectiveness of your Google Ads campaigns and understand which ads are driving the most conversions.
Conversion tracking allows you to track specific actions that users take on your website after clicking on your Google Ads. These actions could include making a purchase, signing up for a newsletter, or completing a contact form. By accurately measuring these conversions, you can determine the success of your ad campaigns and make data-driven decisions to improve their performance.
To get started with Google Ads conversion tracking for your Shopify store, the first step is to create a Google Ads account if you haven't already done so. Once you have an account, you can link it with your Shopify store by following a few simple steps. This integration allows Google Ads to access relevant data from your Shopify store, such as product information and transaction details.
After linking your Google Ads account with Shopify, the next step is to set up conversion actions in Google Ads. Conversion actions represent the specific goals you want to track, such as completed purchases or leads generated. You can create multiple conversion actions based on different objectives for your business.
Once you have defined your conversion actions, it's time to install the Google Ads conversion tracking code on your Shopify store. This code snippet needs to be placed on the relevant pages where you want to track conversions. Shopify makes this process easy by providing built-in integration options for adding the code without any technical expertise required.
Testing and troubleshooting are crucial steps in ensuring accurate conversion tracking setup. It's essential to test the implementation thoroughly and verify that conversions are being tracked correctly. If any issues arise during testing, troubleshooting techniques can help identify and resolve them promptly.
In addition to standard Google Ads conversion tracking, there are advanced options available for more granular tracking capabilities. One such option is Attribuly, a Shopify app that provides enhanced conversion tracking and attribution insights. By implementing Attribuly, you can gain deeper visibility into the customer journey and understand which touchpoints contribute to conversions.
Another advanced tracking method is server-side tracking, which involves sending conversion data directly from your Shopify store to Google Ads servers. This approach offers more control over data transmission and can be beneficial for stores with complex tracking requirements.
Setting up Google ads conversion tracking
To begin setting up Google Ads conversion tracking for your Shopify store, the first step is to create a Google Ads account. If you already have an existing account, you can skip this step and proceed to linking it with your Shopify store.
To create a new Google Ads account, visit the Google Ads website and click on the "Start Now" button. You will be prompted to sign in with your Google account or create a new one if you don't have an existing account. Once signed in, follow the on-screen instructions to set up your account.
After creating your Google Ads account, it's time to link it with your Shopify store. This step is crucial as it allows data to flow seamlessly between both platforms, enabling accurate conversion tracking.
To link your Google Ads account with your Shopify store, log in to your Shopify admin dashboard and navigate to the "Sales Channels" section. From there, click on "Google & Youtube" under the "Online Store" category.
Next, click on the "Connect" button and follow the prompts to authorize Shopify's access to your Google Ads account. You may be asked to sign in again using your Google credentials for verification purposes.
Once connected, you'll need to select the specific Google Ads account you want to link with your Shopify store if you have multiple accounts. Choose the appropriate account from the dropdown menu and save the changes.
By linking your Google Ads account with your Shopify store, you establish a direct connection that allows for seamless data sharing between both platforms. This integration ensures that all relevant information regarding purchases and conversions is accurately tracked and attributed within Google Ads.
It's important to note that this linkage also enables additional features such as dynamic remarketing campaigns where personalized ads are shown based on user behavior on your website. Moreover, by integrating these two platforms, you gain access to valuable insights about customer behavior and campaign performance through detailed reporting within Google Ads.
In summary, creating a Google Ads account and linking it with your Shopify store is the first step in setting up conversion tracking. This integration allows for accurate data sharing between both platforms, enabling you to track conversions and optimize your advertising campaigns effectively.
Next, we will explore how to set up conversion actions in Google Ads for different goals, ensuring that you are tracking the most relevant metrics for your business. Stay tuned for the next section of our step-by-step guide on setting up Google Ads conversion tracking for Shopify.
Setting Up Conversion Actions in Google Ads
Setting up conversion actions in Google Ads is an essential step in tracking the success of your advertising campaigns and measuring the return on investment (ROI) for your Shopify store. Conversion actions allow you to track specific actions that users take on your website, such as making a purchase, signing up for a newsletter, or completing a form. By setting up conversion actions, you can gain valuable insights into which ads and keywords are driving the most conversions and optimize your campaigns accordingly.
Understanding Different Goals for Conversion Actions
Before setting up conversion actions in Google Ads, it's important to have a clear understanding of the goals you want to track. Different businesses may have different objectives, so it's crucial to identify the specific actions that indicate success for your Shopify store. Some common conversion goals include:
-
Purchase: This goal tracks when a customer completes a purchase on your website. It allows you to measure the revenue generated from your ads and optimize your campaigns based on actual sales data.
-
Sign-up: If your goal is to grow your email list or gather leads, tracking sign-ups can help you measure the effectiveness of your ads in driving user registrations.
-
Add to cart: Tracking when users add items to their shopping carts can give you insights into their purchase intent and help you optimize your campaigns for higher conversion rates.
Step-by-Step Guide on Setting Up Conversion Actions in Google Ads
Once you have identified the goals you want to track, follow these steps to set up conversion actions in Google Ads:
-
Sign in to your Google Ads account and navigate to the "Tools & Settings" menu.
-
Select "Conversions" from the dropdown menu.
-
Click on the plus button to create a new conversion action.
-
Choose the type of conversion action that aligns with your goal, such as "Purchase," "Sign-up," or "Add to cart."
-
Provide a clear and descriptive name for your conversion action.
-
Set the value for each conversion if applicable. This is particularly important for tracking revenue generated from purchases.
-
Select the appropriate attribution model to determine how credit is assigned to different ad interactions leading up to a conversion.
-
Configure any additional settings, such as including/excluding specific pages or URLs from being counted as conversions.
-
Generate the conversion tracking code snippet and install it on the corresponding pages of your Shopify store.
By following these steps, you can set up conversion actions in Google Ads that align with your specific goals and start tracking the success of your advertising campaigns on Shopify. Remember to regularly monitor and analyze the data provided by Google Ads to make informed decisions about optimizing your campaigns for better ROI.
Testing and Troubleshooting Conversion Tracking Setup
To ensure that your Google Ads conversion tracking is set up correctly and accurately tracking conversions on your Shopify store, it is essential to thoroughly test and troubleshoot the setup. This will help you identify any issues or errors that may be affecting the tracking of conversions. In this section, we will discuss how to test the conversion tracking setup and troubleshoot common issues.
Testing the Conversion Tracking Setup
Once you have connected Google & Youtube, it is important to verify that it is working correctly. To do this, follow these steps:
-
Go to your Shopify store and navigate to a page where a conversion should occur, such as the checkout page or a thank-you page.
-
Perform a test transaction by adding a product to your cart and completing the purchase process.
-
After completing the transaction, go to your Google Ads account and navigate to the "Conversions" section.
-
Look for the conversion action that corresponds to the completed transaction and check if it recorded the conversion.
If the conversion is successfully recorded in Google Ads, congratulations! Your conversion tracking setup is working properly. However, if no conversion is recorded or there are discrepancies in the data, you may need to troubleshoot the setup.
Troubleshooting Common Issues
Here are some common issues that you may encounter when setting up Google Ads conversion tracking for Shopify and how to troubleshoot them:
-
Delayed reporting: It can take some time for conversions to appear in your Google Ads account after they occur on your Shopify store. Wait for at least 24 hours before troubleshooting further. Or consider real-time tracking & attribution software such as Attribuly.
-
Multiple instances of the conversion tracking code: Ensure that you have only installed one instance of the conversion tracking code on your Shopify store. Having multiple instances can lead to duplicate conversion tracking.
-
Ad blockers or browser extensions: Some ad blockers or browser extensions may interfere with the tracking code and prevent it from functioning correctly. You may consider server-side tracking that will be introduced later.
-
Cross-domain tracking issues: If you have multiple domains or subdomains linked to your Shopify store, ensure that cross-domain tracking is properly set up in Google Ads.
If you have followed these troubleshooting steps and are still experiencing issues with your Google Ads conversion tracking setup, it may be helpful to reach out to Google Ads support for further assistance. They can provide guidance specific to your setup and help resolve any technical issues.
Setting Up Attribuly for Conversion Tracking
The limitation of Shopify Google channel
-
Real-time tracking. Instant conversion tracking is critical to understand ads performance and adjust your ads. But it can take up to 24 hours for conversion data to start appearing in Google ads. This delay will leave a lot of money on the table.
-
Multi-touch attribution. When you run other campaigns such as Facebook ads, you will frequently find data discrepancies between Shopify admin and your ads managers. Multi-touch attribution will help you to send credit correctly to different touchpoints.
-
When you look into the conversion details, you can't link the conversions to specific customers. This missing information is a big challenge to understand customer journey.
Understanding the Benefits of Using Attribuly for Conversion Tracking
The real-time attribution technology of Attribuly can track and attribute conversions in seconds, not hours. So when you get new order, you can immediately go to attribution page to see whole customer journey.
One of the another key benefits of using Attribuly is its ability to track multi-touchpoint conversions. Unlike traditional last-click attribution models, which only credit the final touchpoint before a conversion, Attribuly takes into account all touchpoints along the customer journey. This means you get a more holistic view of how different marketing efforts contribute to conversions. Data discrepancies can also be solved.
Step-by-Step Guide on Setting Up Attribuly
Now that we understand the benefits of using Attribuly let's proceed with setting it up for your Shopify store. Here are the steps:
-
Sign in to Attribuly and navigate to Integrations
-
Connect "Google ads" with your ads admin account.
-
Update tracking template for all your existing ads. Attribuly will offer a method to update the template automaticlly.
Once you have successfully set up Attribuly, it will start tracking conversions based on the attribution model you have chosen, and pull account/spend data to Attribuly. You can then analyze the data in Attribution model.
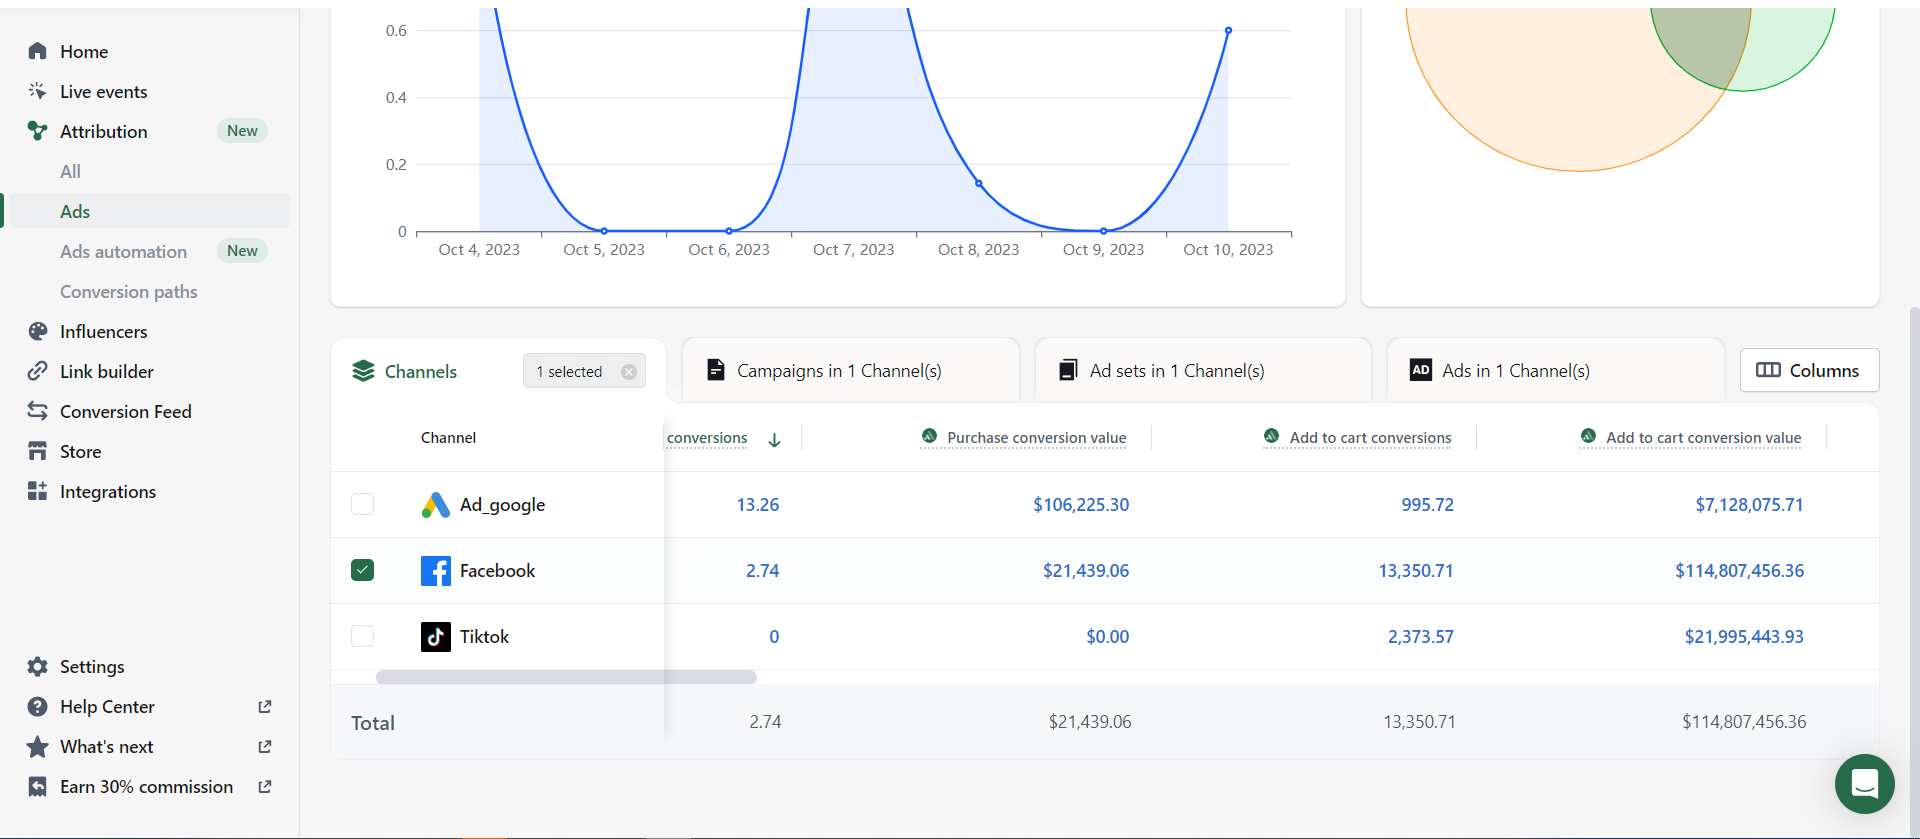
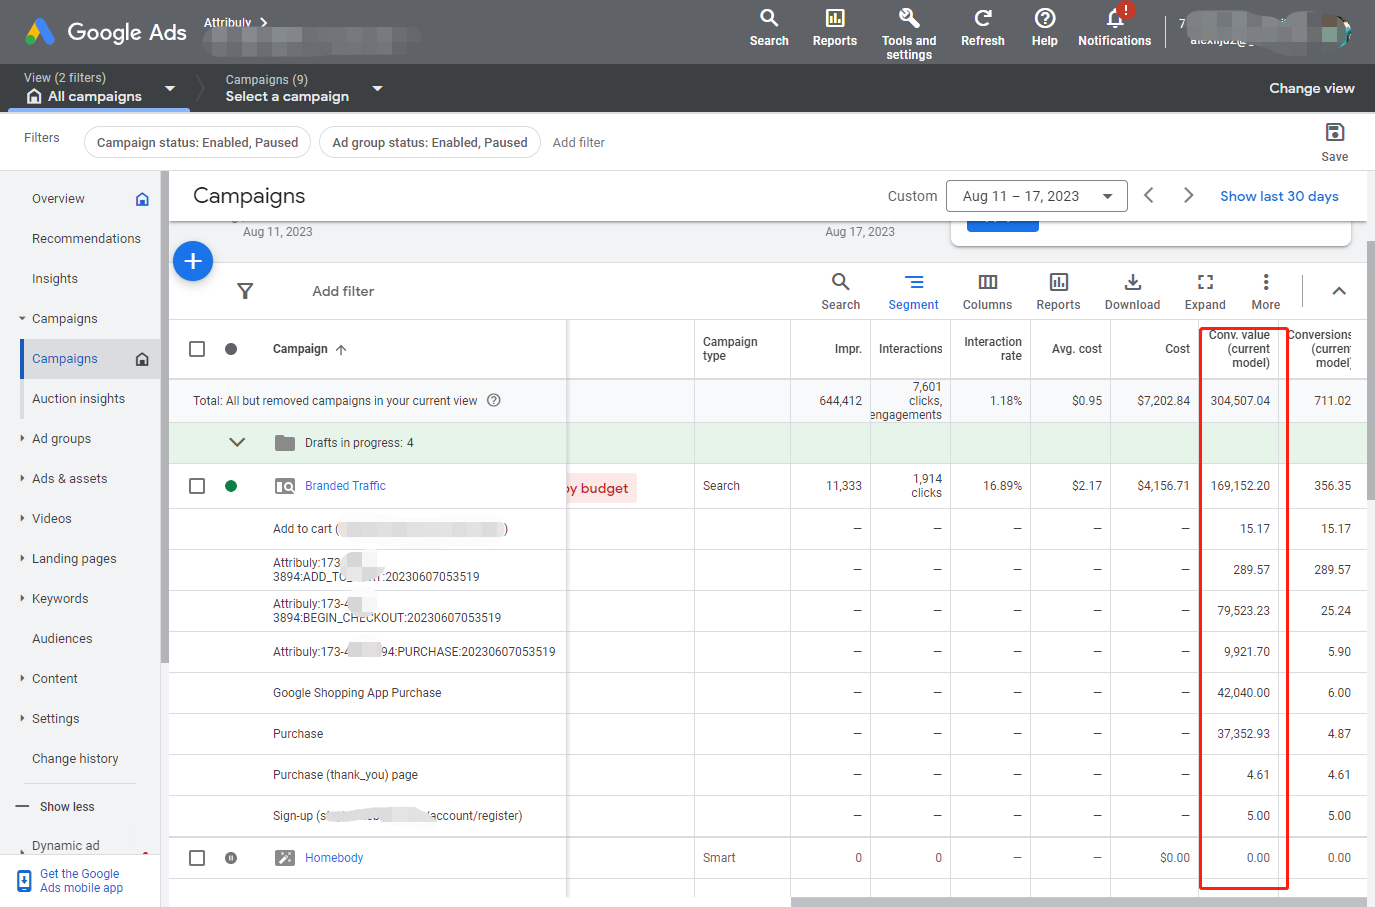
Some important metrics
-
Purchase/add to cart/checkout start/payment info submission conversions and value by Attribuly pixel. This data is only for tracking after Attribuly installation.
-
Purchase and ROAS from Google ads manager. The data is pulled from Google API, historic data before Attribuly installation is also available.
-
ncPurchase and ncROAS. the new customer purchase value and ROAS.
-
impressions.
-
CPM. CPM stands for cost per 1,000 impressions.
-
Purchase CVR. CVR(conversion rate) is the percentage of link clicks to
your website that resulted in a purchase. -
CPC
-
CTR
Setting Up Server-Side Tracking
As mentioned before, the tracking tag deployed in browser can be blocked by ad blockers. To avoid missing conversions, setting up server-side tracking is an advanced method for tracking conversions in Google Ads. Unlike traditional pixel-based tracking, server-side tracking allows you to send conversion data directly from your Shopify store's server to Google Ads. This method offers several benefits, including increased accuracy and improved privacy compliance.
To set up server-side tracking, you first need to understand the concept behind it. Server-side tracking involves sending conversion data to Google Ads through Google ads API. This ensures that the data is securely transmitted and reduces the risk of data loss or tampering.
Since Google ads does not deduplicate data between client-side and server-side, you have to run this conversion in parallel with your client-side or replace your client-side conversion. and set the server-side as the primary action.
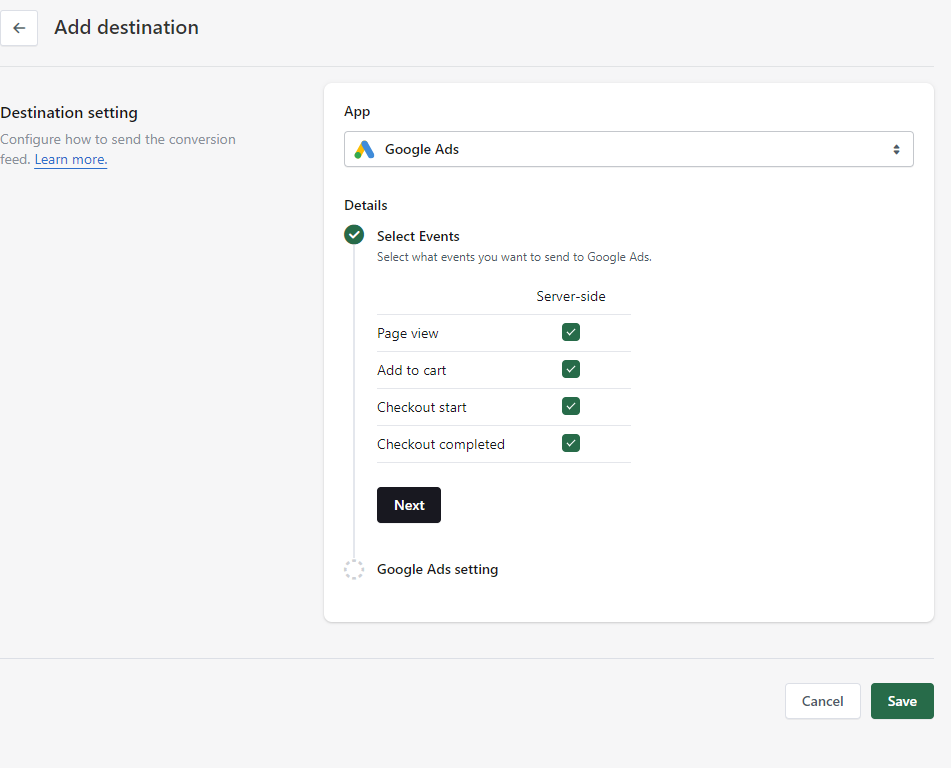
What data is transferred?
Google supports below events:
-
Page view
-
Add to cart
-
Checkout start
-
Checkout completed
Step1: Set up conversion feed
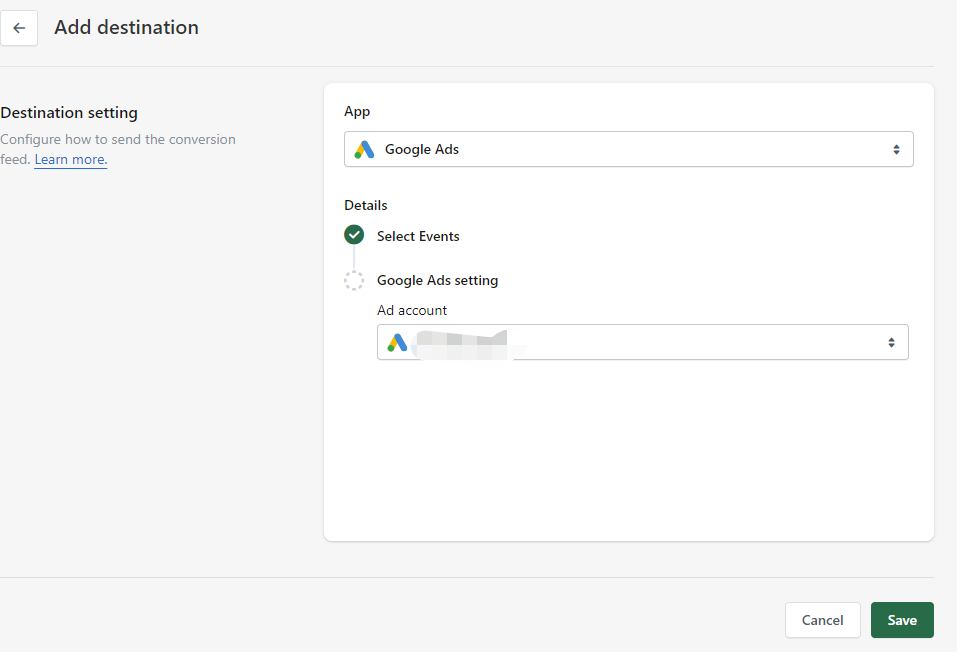
Create a new destination, follow the steps.
Your connected Gogole ads account will display in the next step, choose which account you want to sent to, and save.
Step 2: Set primary conversion
Go to Google ads manager, click to tools and setting-Measurement- conversion
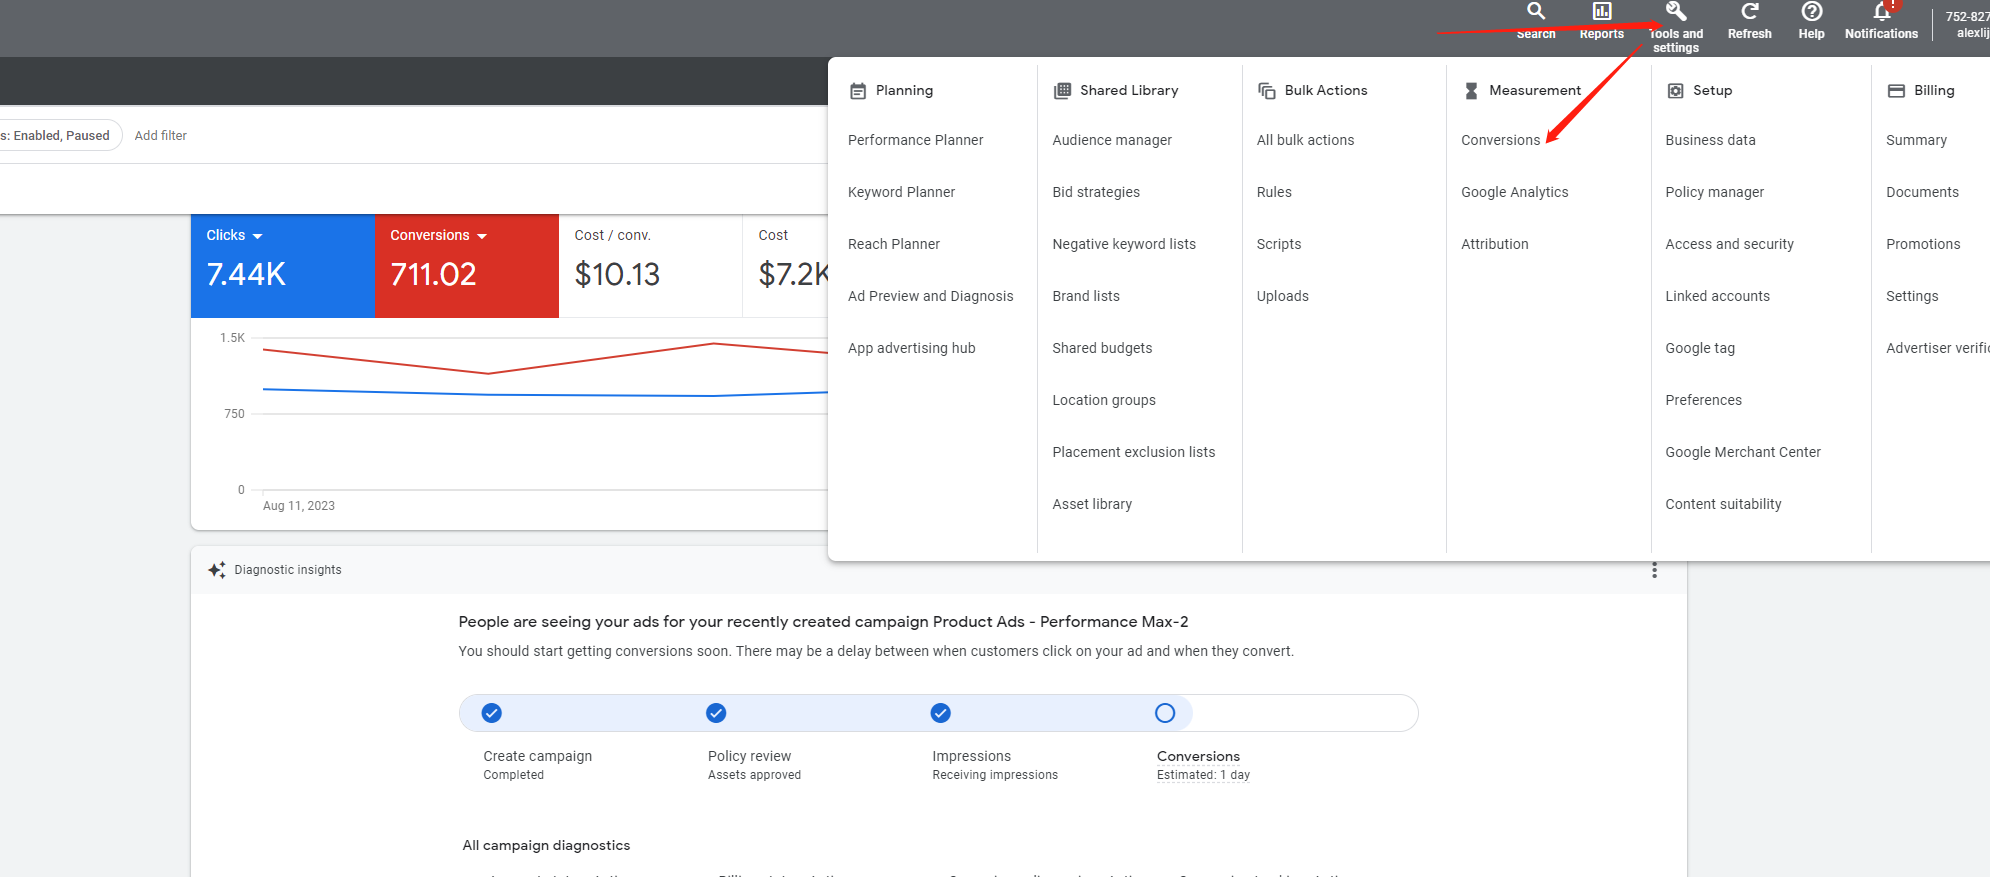
You will see a conversion action starting with "Attribuly xxx", this is the convesion data sent from Attribuly.
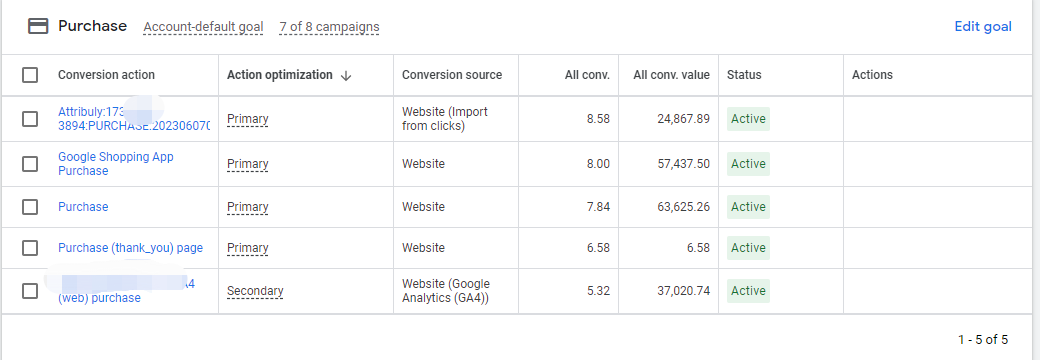
And Google sums all the primary actions as your total conversion value. So you need to only set one correct primary action for your bidding optimization. Or your value attributed to Google ads, will be bigger than the actual
Go to the conversion action setting, set Attribuly purchase as the primary action, and set all the other actions as secondary.
Conclusion
In conclusion, setting up Google Ads conversion tracking for your Shopify store is a crucial step in optimizing your bidding and maximizing your return on investment. By accurately tracking conversions, you can gain valuable insights into the effectiveness of your ads and make data-driven decisions to improve your marketing strategies.
Throughout this step-by-step guide, we have covered the importance of conversion tracking in Google Ads and provided detailed instructions on how to set it up for your Shopify store. We started by creating a Google Ads account and linking it with your Shopify store, ensuring that the two platforms are seamlessly integrated.
By following this comprehensive guide, you can confidently set up Google Ads conversion tracking for your Shopify store. Remember that accurate conversion tracking is vital for measuring the success of your advertising efforts and making informed decisions to drive business growth.
Install Attribuly free or Contact us for support