August 2026

New features, improvements, and fixes in Attribuly.

Have an idea? Share feedback · Roadmap

12 updates

Channel Shopify Shop Attribution Update

Background

We are improving Shopify Shop attribution so that orders and visits from the Shop app can be identified more consistently in attribution paths.

Previously, Shopify Shop events were mainly added during order backfill. This could miss some cases, such as orders that already had tracking events or orders that matched other visits during backfill.

Changes

Order-Level Rule

During attribution path cleaning, we will check each order's channel_name.

If channel_name = Shop, a shopify_shop event will be added to the order's attribution path.

Visit-Level Rule

When a visit URL contains utm_source=shop_app, the visit will be recognized as shopify_shop.

This rule will not apply if page_referrer is from the same website.

Benefits

  • Improves Shopify Shop attribution accuracy.
  • Makes Shop app orders visible in attribution paths.
  • Prevents internal site navigation from being incorrectly classified as Shopify Shop.
  • Keeps reporting more consistent with Shopify order channel data.

Problem Solved

With this update, Shopify Shop can be identified from both the order channel and visit UTM signals.

View update

Segment Filtering by Customer Total Spend

What Is New

You can now build customer segments based on each customer's total order amount.

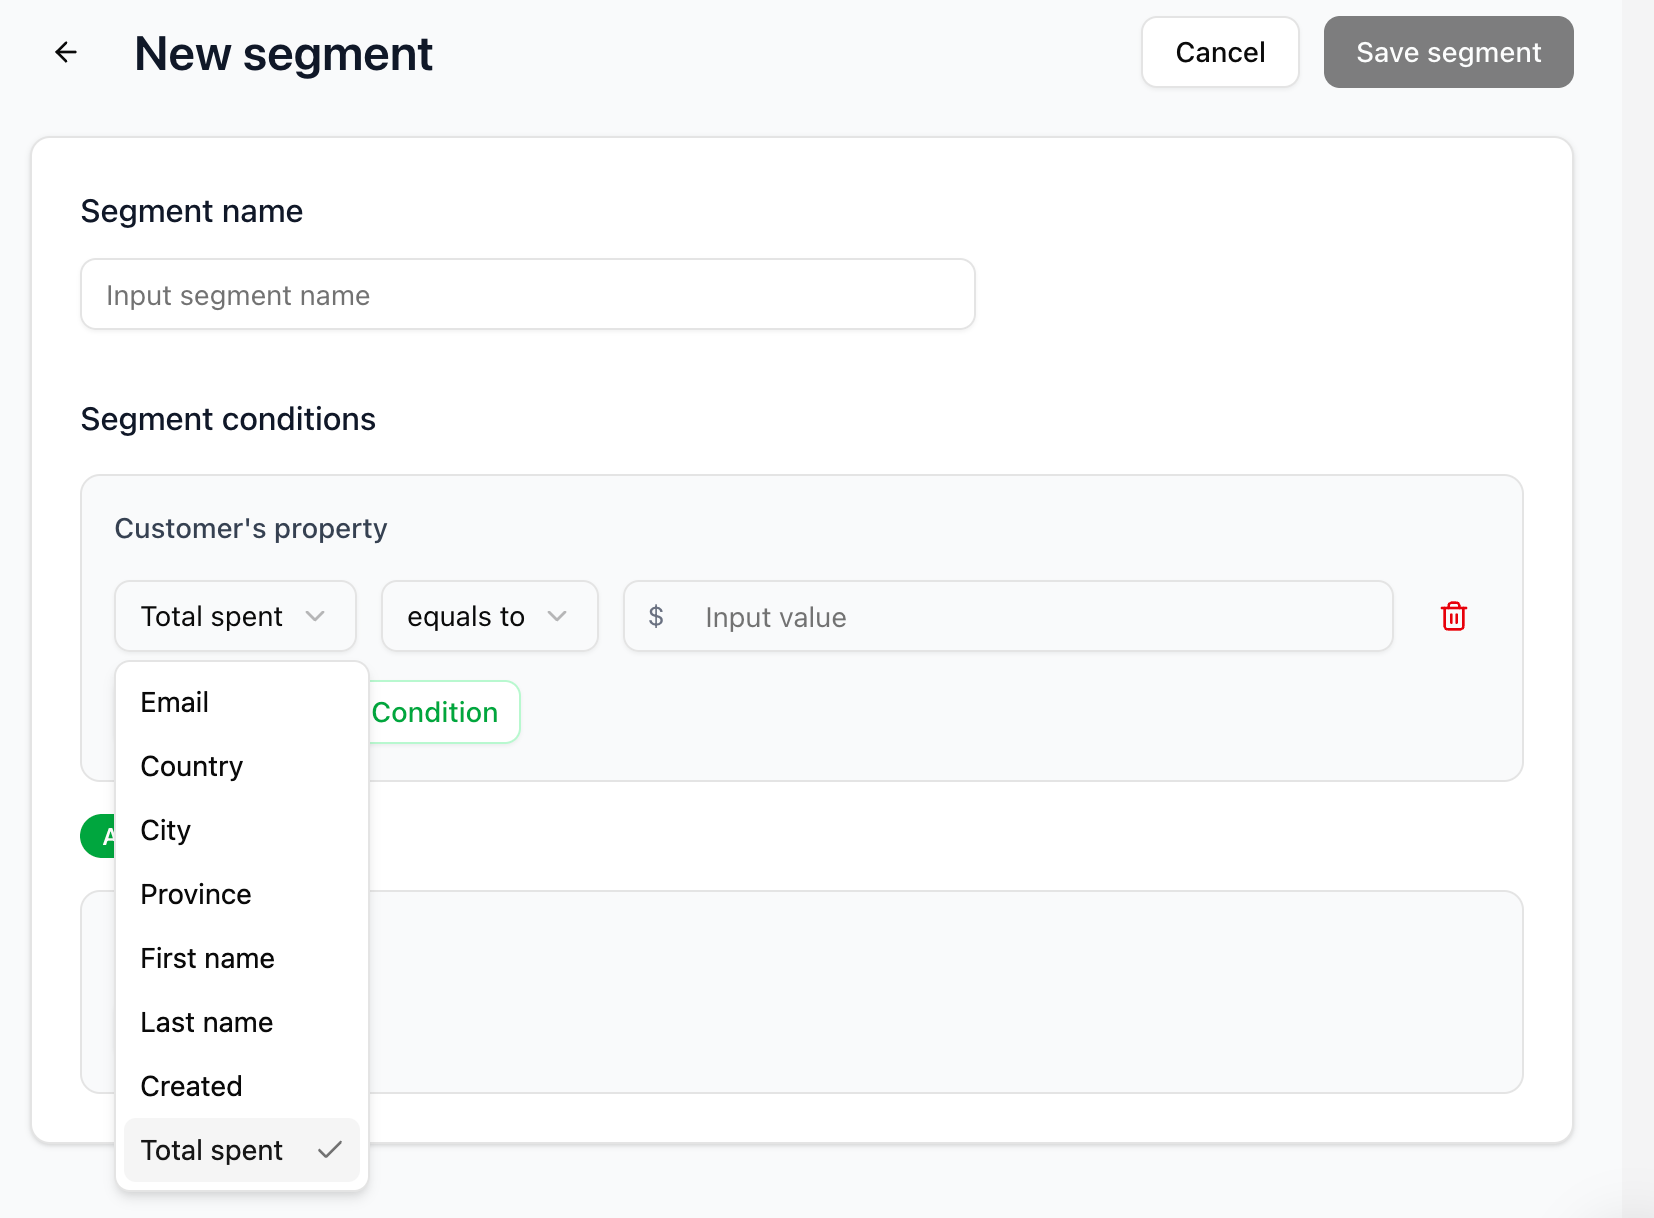
In Segment conditions, the Customer's property section now includes a new property:

  • Total spent

This condition uses the customer's lifetime total order amount from Shop customer data. It helps you create more precise customer groups based on purchase value, such as high-value customers, low-spend customers, or customers who have not reached a target purchase threshold yet.

How To Use It

  1. Go to Store.
  2. Open Segments.
  3. Create a new segment or edit an existing segment.
  4. In Segment conditions, find the Customer's property section.
  5. Add a new condition.
  6. Select Total spent as the property.
  7. Choose a comparison operator:
    • is greater than
    • is less than
    • equals to
    • does not equal
  8. Enter the spend amount you want to use for filtering.
  9. Save the segment. image

Example Use Cases

High-Value Customers

Create a segment for customers whose total order amount is greater than 500.

Example:

Customer's property: Total spent Condition: is greater than Value: 500

This segment can be used to identify loyal or high-value customers for VIP campaigns, retention programs, or exclusive offers.

Customers Below A Purchase Threshold

Create a segment for customers whose total order amount is less than 100.

Example:

Customer's property: Total spent Condition: is less than Value: 100

This segment can help you find customers who have purchased but have not yet reached a meaningful spending level.

Exact Spend Matching

Create a segment for customers whose total order amount equals a specific value.

Example:

Customer's property: Total spent Condition: equals to Value: 0

This can help you identify customers with no recorded spending in Shop customer data.

Currency Display

The amount input displays the store's currency symbol automatically.

For example:

$ 500 € 500 ¥ 500

The currency symbol is shown to make the input easier to understand. The segment condition itself is saved as a numeric amount, so the filtering logic remains consistent with the store's Shop customer data.

What Problem This Solves

Before this update, customer segments could be built from customer attributes and behavior events, but there was no simple way to filter customers by their total order amount.

With this update, merchants can:

  • Find customers who have spent more than a specific amount.
  • Build high-value customer segments for retention and loyalty campaigns.
  • Separate low-spend customers from repeat or VIP customers.
  • Create more targeted audiences for email, ads, and customer lifecycle campaigns.
  • Use Shop customer lifetime spend directly in segmentation rules.

Data Source

This condition is calculated from Shop customer data.

The filtering logic uses:

shop_customers.total_spent

This means the segment is based on the total amount recorded for each Shop customer.

Notes

  • The value should be entered as a number only.
  • The store currency symbol is displayed automatically in the input field.
  • Supported operators are currently greater than, less than, equals to, and does not equal.
  • The condition works together with other segment conditions, so it can be combined with customer properties and customer behavior rules.
View update

New Metric: Click Conversion Rate

We’ve added a new metric, Click Conversion Rate, to help you better understand how efficiently ad clicks turn into conversions.

Click Conversion Rate is calculated as:

Conversions / Clicks × 100%

Previously, clicks and conversions were available as separate metrics, but it was harder to quickly evaluate how effectively clicks were turning into conversions. This new metric makes it easier to compare performance across campaigns, ad sets, ads, and other attribution breakdowns.

You can view Click Conversion Rate in both All Attribution and Ads Attribution reports. Open either report and check the Click conversion rate column in the data table. If the column is not visible, update your table column settings to include Click conversion rate.

View update

Compare Ad Attribution Performance Across Date Ranges

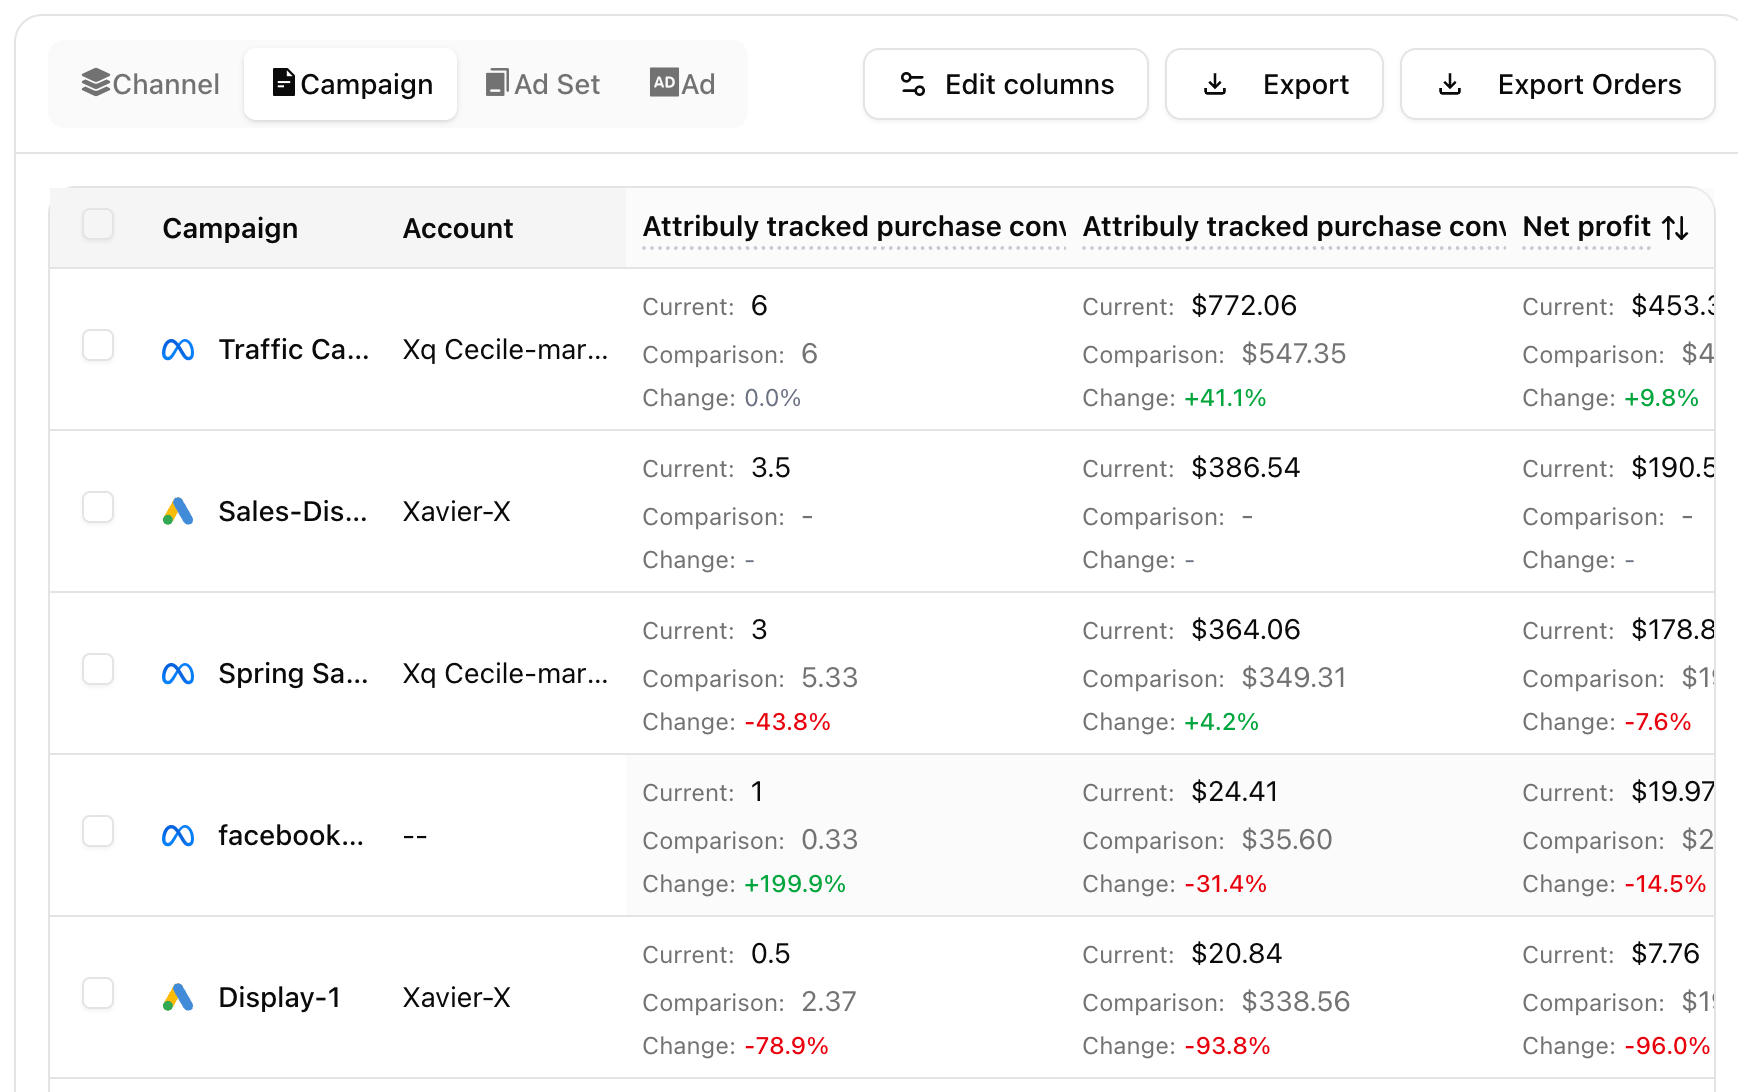
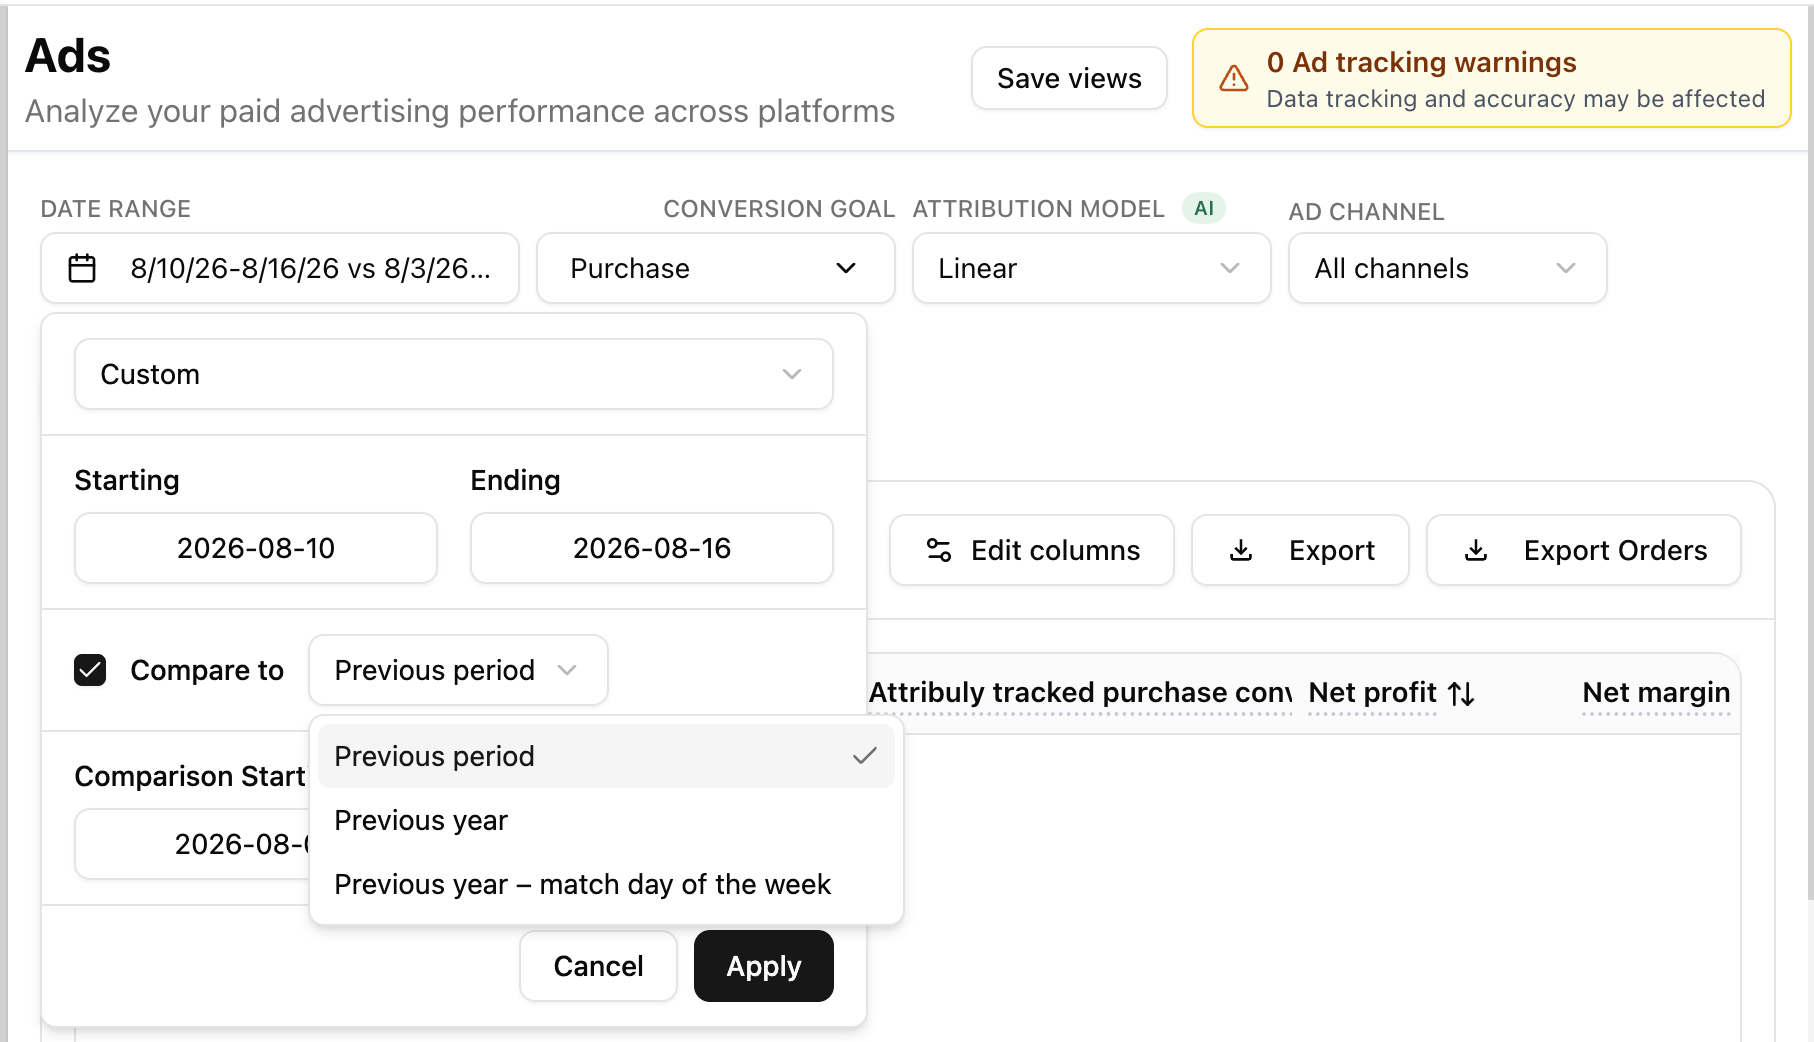
Previously, Ads Attribution only showed one date range at a time, so users had to manually switch dates or export reports to compare performance. With date comparison, users can now evaluate performance changes directly in the report and identify what changed between two periods.

What’s New You can now use Compare to in the Ads Attribution date picker, just like in All Attribution. This lets you compare your current reporting period against a previous period, previous year, or a custom date range directly inside the Ads Attribution report.

How To Use

  • Go to Attribution > Ads.
  • Open the date range picker.
  • Select your main date range.
  • Turn on Compare to.
  • Choose a comparison option such as Previous period, Previous year, or a custom comparison range.
  • Click Apply to refresh the report.
  • Review each metric in the table with Current, Comparison, and Change values. image

What You’ll See

  • Each Ads Attribution metric now shows the current period value.
  • The matching comparison period value appears directly below it.
  • A percentage change is shown so you can quickly identify increases or decreases.
  • Totals also include current, comparison, and change values. image

Why It Helps

  • Quickly understand whether ad performance improved or declined.
  • Compare campaigns, ad sets, ads, and channels across different periods.
  • Spot spend, ROAS, CPA, conversion, and revenue changes without exporting data.
  • Make faster optimization decisions based on period-over-period performance.
View update

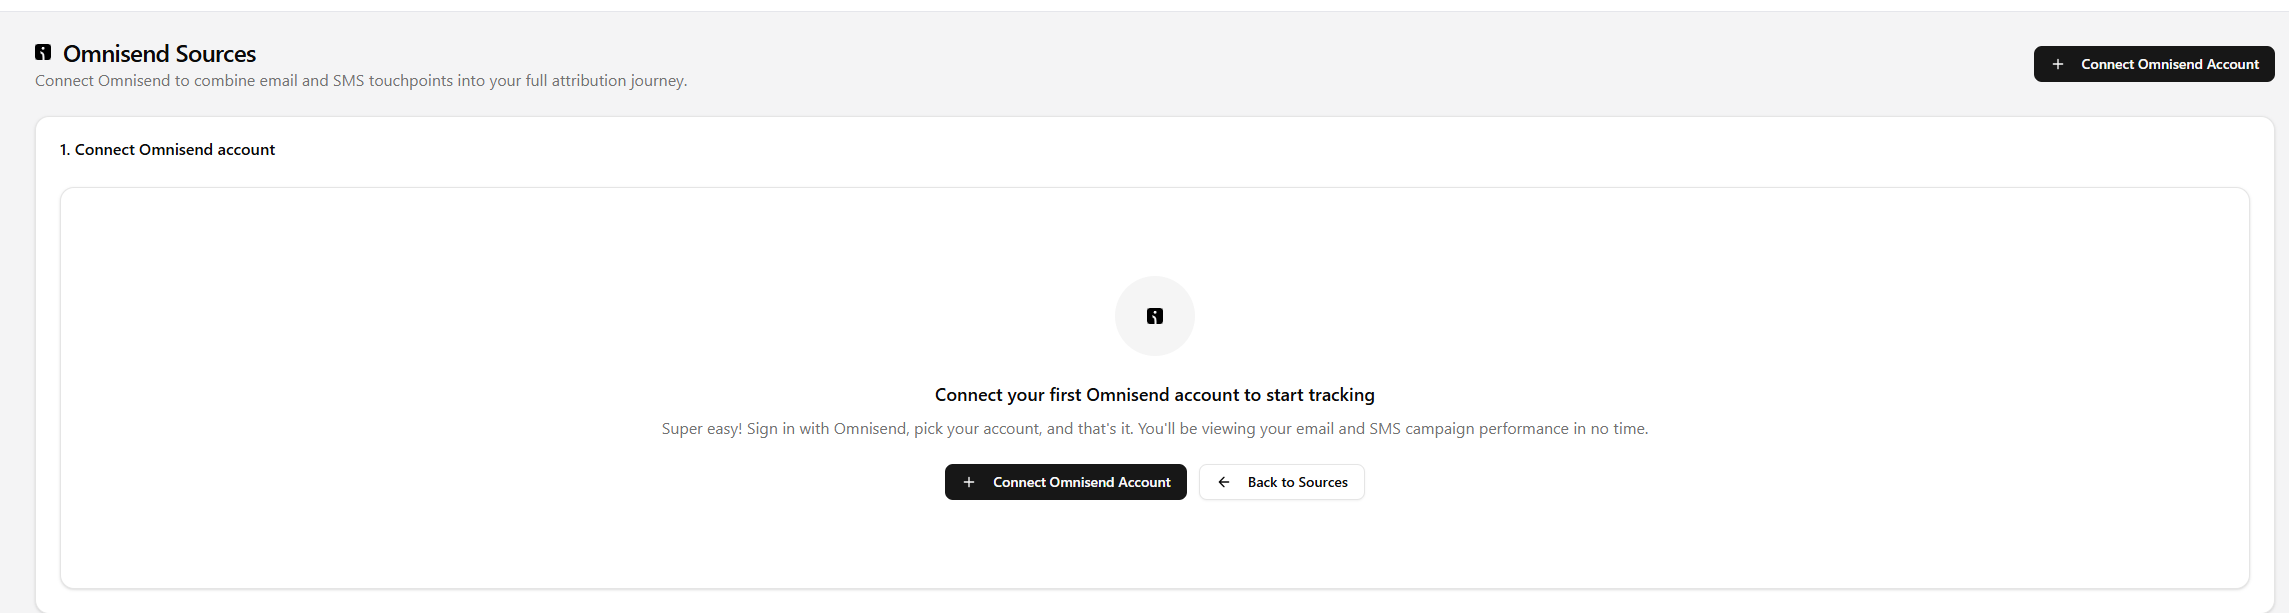
Recapture page data supports Omnisend data display.

Feature: Recapture page data supports Omnisend data display.

What’s new
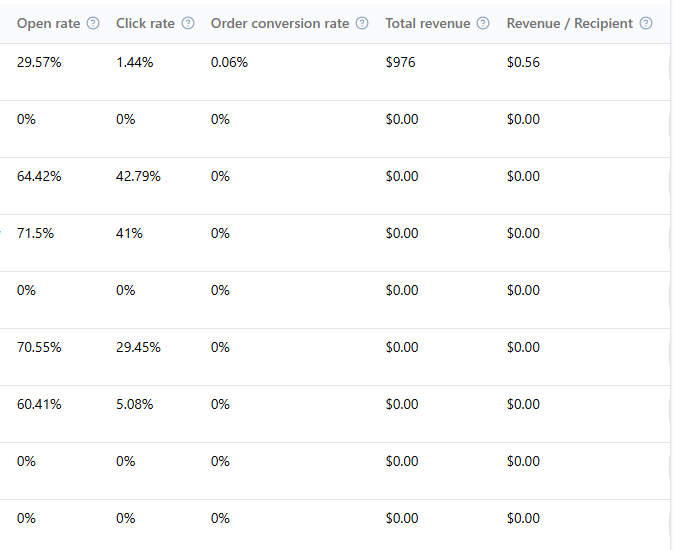
Unified Omnisend recovery view: A single view of how Recapture contributes to Omnisend recovery, including revenue, events, and key workflow impact.

Event diagnostics: Gives a quick view of which events are enabled for Omnisend recovery workflows, event‑level revenue contribution, and trend and performance of each event. So you can quickly identify where recovery coverage is strong — and where workflow impact is underperforming. Prerequisite: Please reconnect your Omnisend integration on the Sources page to enable this capability. image

View update

Recapture page data supports Cartsee data display.

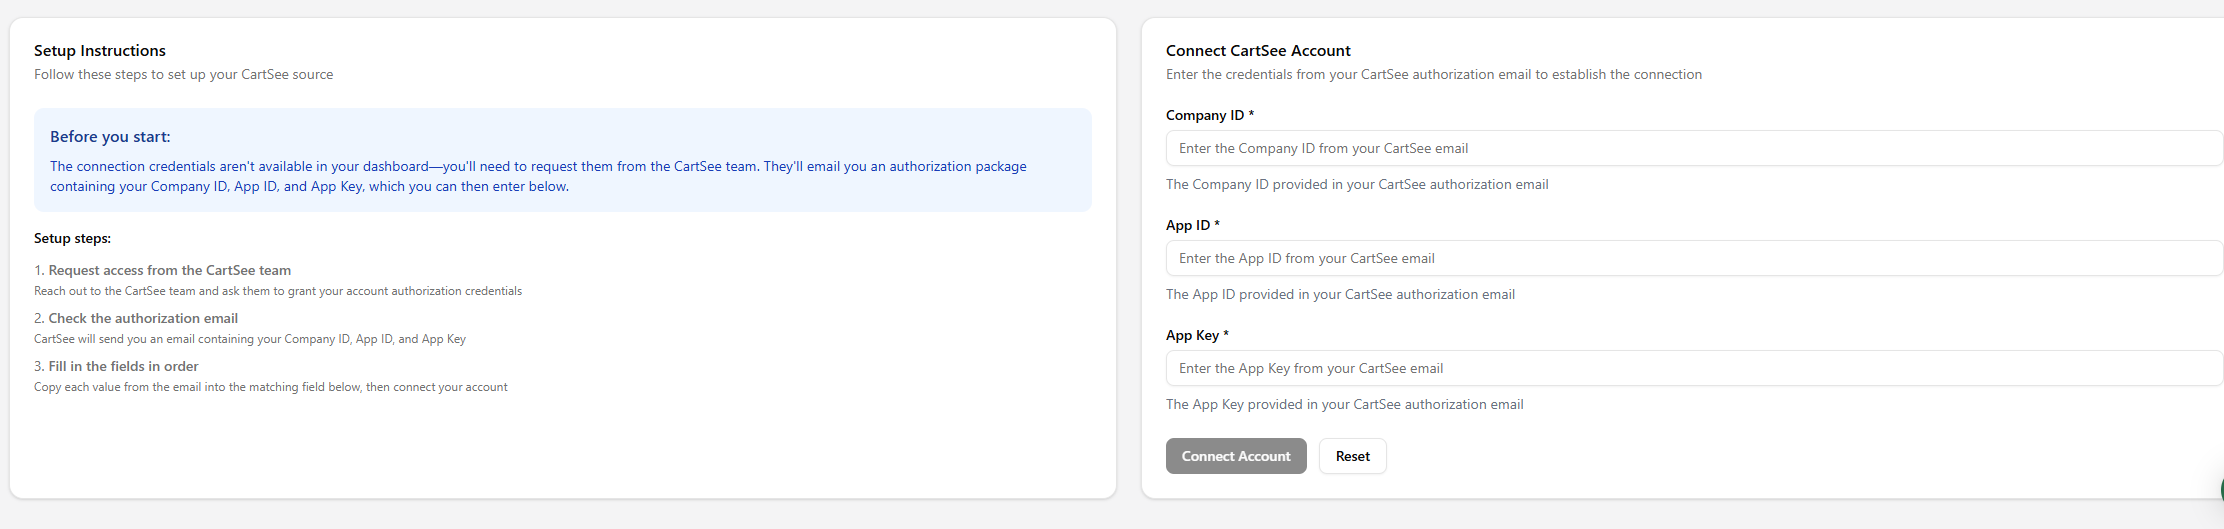
Feature: Recapture page data supports Cartsee data display. What’s new

Unified Cartsee recovery view: A single view of how Recapture contributes to Cartsee recovery, including revenue, events, and key workflow impact.

Event diagnostics: Gives a quick view of which events are enabled for Cartsee recovery workflows, event‑level revenue contribution, and trend and performance of each event. So you can quickly identify where recovery coverage is strong — and where workflow impact is underperforming. Prerequisite: Please reconnect your Cartsee integration on the Sources page to enable this capability. image

View update

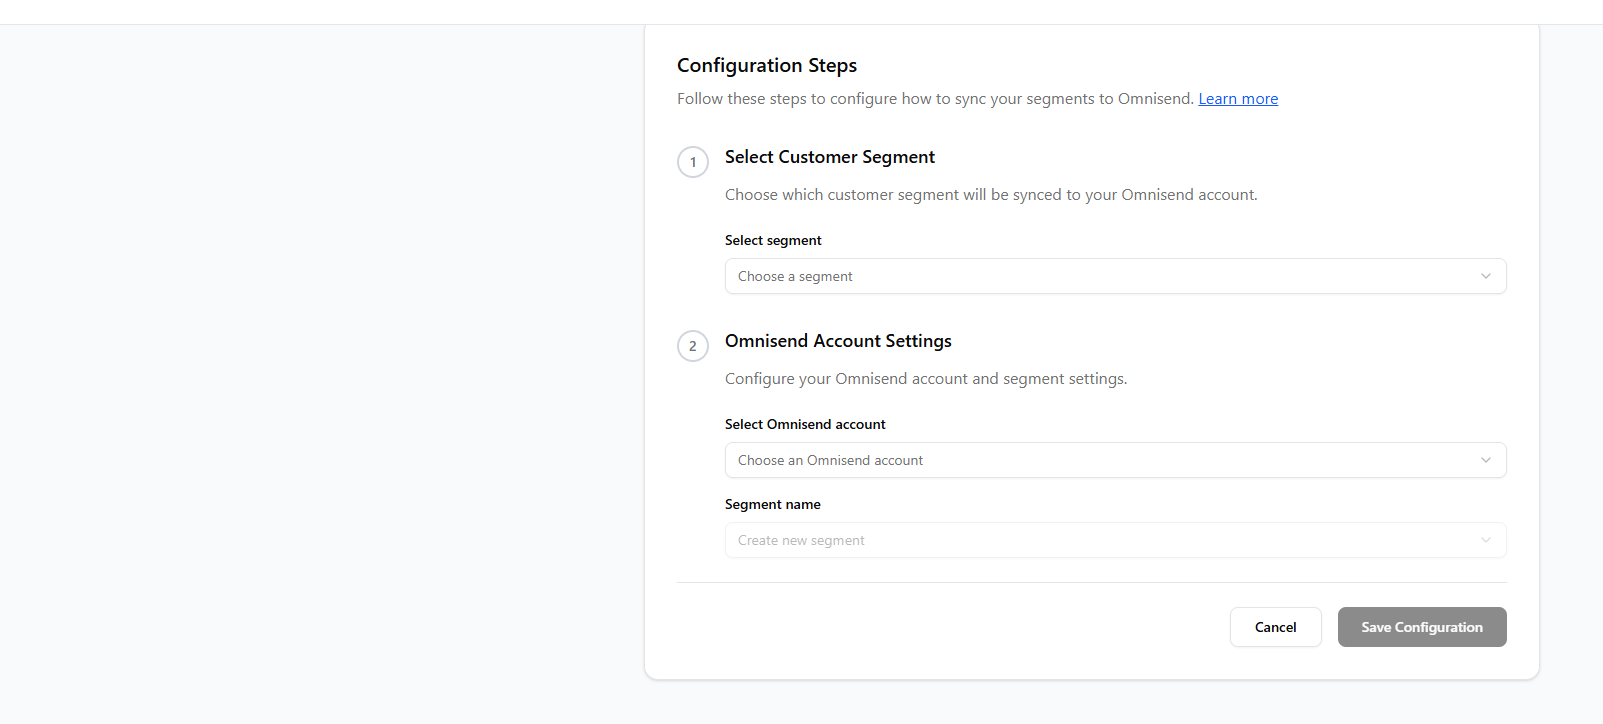
Add support for synchronizing segments to Omnisend

You can now push your Attribuly‑built audience segments to Omnisend via Connections > Destinations. After enabling the destination, Attribuly will keep segment members synchronized to Omnisend. Existing Omnisend integrations require re‑authorization to unlock this new segment sync capability. image

View update

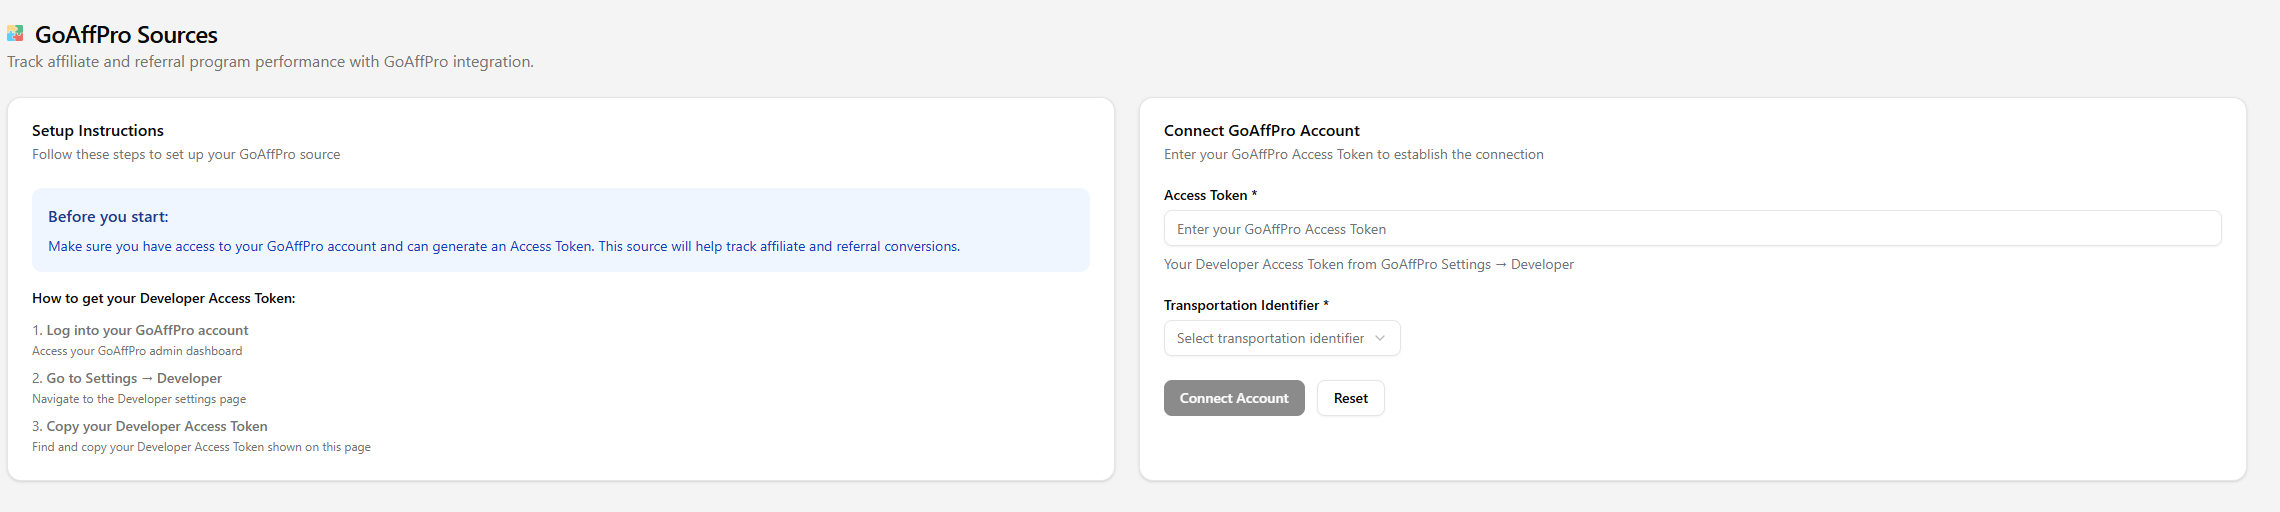
Goaffpro Integration & Attribution Recognition

New Capabilities

1. Goaffpro Account Connection & Affiliates Metadata Sync

  • Allow merchants to connect their Goaffpro account on the source settings page.
  • Fetch all affiliates data (Affiliate Name and corresponding unique Referral Code) via Goaffpro API.
  • Implement periodic background sync to keep Referral Codes up‑to‑date, as Referral Codes are editable by affiliates. 2.Every affiliate owns an exclusive Referral Code, which will be appended as the ref URL parameter by default for all Goaffpro generated links.
  • New Goaffpro Attribution Recognition Rule
  • Detect Goaffpro traffic when URL contains the ref parameter and its value matches a valid Referral Code retrieved from the connected Goaffpro account.
  • Once matched, mark the visit as a Goaffpro‑sourced session.

Goaffpro Traffic Parameter Resolution Logic
Campaign

  1. Affiliate Name retrieved by matched ref Referral Code
  2. Fallback to utm_campaign
  3. Empty string if neither value is available

Source

  1. Read utm_source from URL query
  2. Fallback to default value: Goaffpro

Medium

  1. Read utm_medium from URL query
  2. Fallback to default value: affiliate

image

View update

Full Impact Attribution Rollout Update

We’ve updated the Attribution Model selector to better reflect the rollout stages of Full Impact attribution.

  • When Full Impact is still being prepared, the existing Preparing state remains unchanged.
  • When the lite version is available, it is now displayed as Full Impact Lite .
  • When the view-through model is available, it is now displayed as Full Impact (View-through) .
View update
Showing 10 of 12