Shopify DPA Retargeting: Step-by-Step Dynamic Product Ads Setup for Meta & Google
Step-by-step guide to set up Shopify DPA retargeting for Meta and Google—catalog sync, ID mapping, Pixel+CAPI, GA4 & Consent Mode v2 for reliable dynamic ads.
If your dynamic ads are showing the wrong products—or not serving at all—it’s almost always one of three things: catalog IDs don’t match site events, consent is blocking remarketing, or feeds aren’t approved. This tutorial walks you through a clean, 2026-ready build for Shopify DPA retargeting on Meta and dynamic remarketing on Google, with verification steps so you can trust every click.
Key takeaways
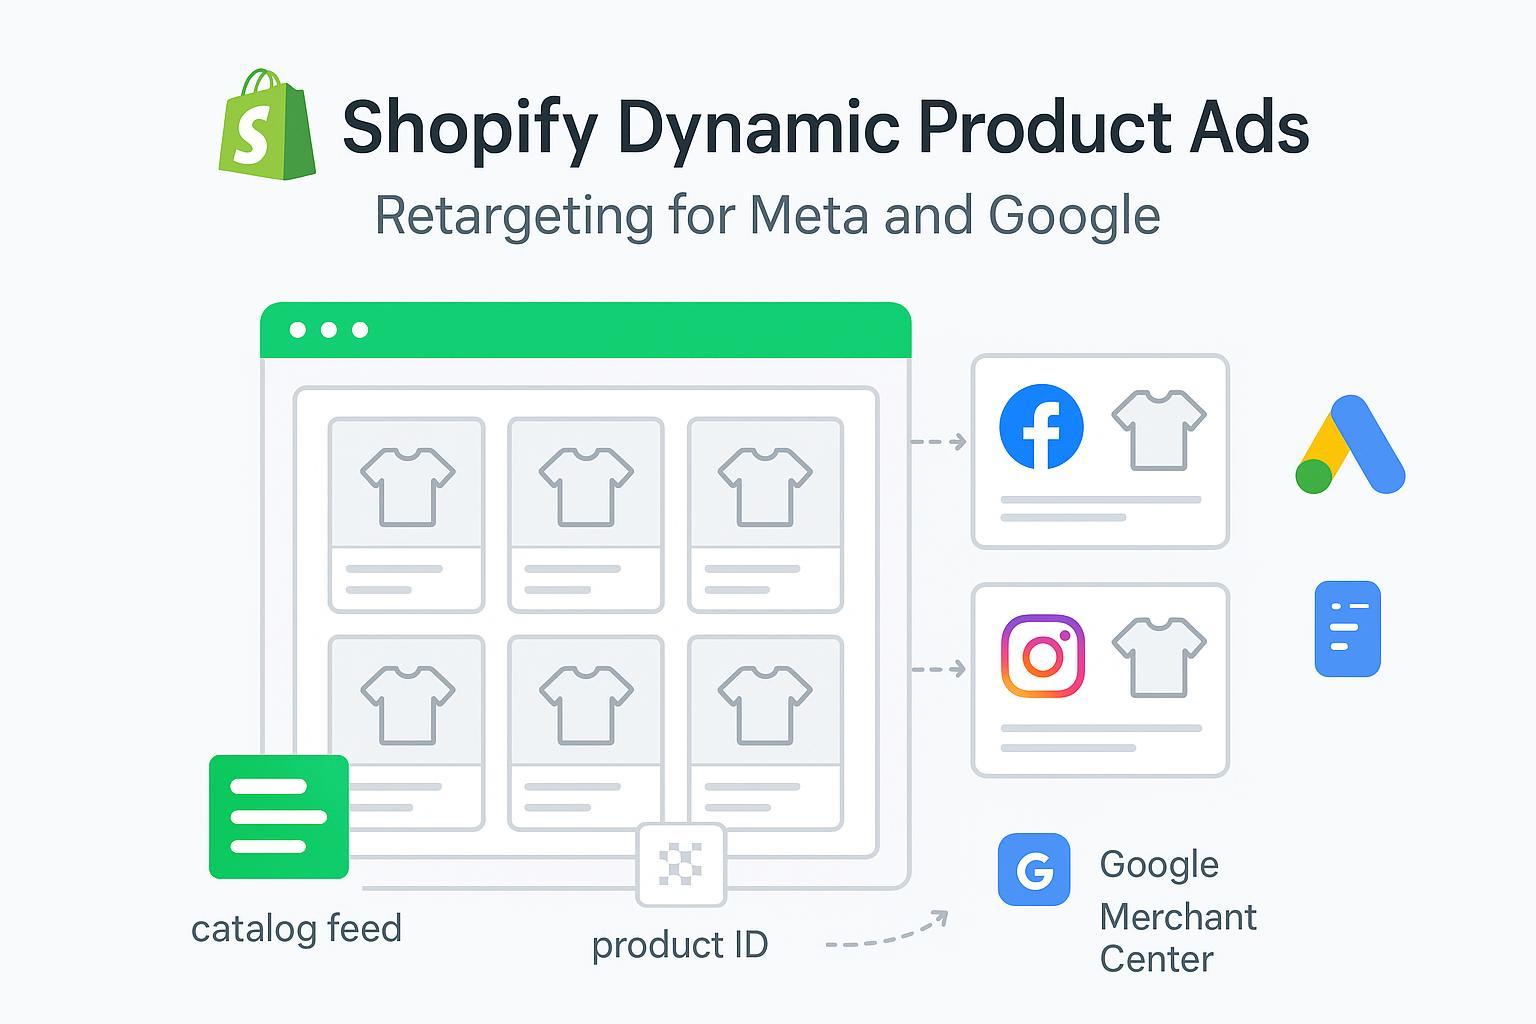
You need two pillars for Shopify DPA retargeting to work: an approved product catalog/feed and event tags that reference matching product identifiers.
Map Shopify variant_id/product_id to platform-specific item IDs up front; this prevents low match rates and blank ad renders.
Enable server-side measurement (Meta CAPI) and implement Google Consent Mode v2 before you scale. It protects data quality and keeps remarketing lawful.
QA first: clear Diagnostics in Commerce Manager and Merchant Center, confirm deduplication in Events Manager, and verify GA4 audiences actually publish to Google Ads.
1) Prerequisites and the quick decision tree for Shopify DPA retargeting
Before you touch campaigns, confirm access and pick the integration path. Install and connect the Facebook & Instagram by Meta and Google & YouTube channels in Shopify. Ensure you have permissions for Meta Commerce Manager, Events Manager, and your ad account, plus Google Merchant Center, Google Ads, and GA4. Start with native Shopify channels—they’re fastest for most stores. Consider server-side/advanced setups later if you need custom payloads or complex geo consent logic.
Helpful references: Set up Facebook & Instagram by Meta in Shopify (official Shopify doc): channel setup and data sharing overview. For Google, review Merchant Center product data requirements: supported attributes and values.
2) Data foundations: get IDs right once
Dynamic ads depend on an exact ID handshake between your site events and your catalogs/feeds.
Shopify exposes both product IDs and variant IDs.
Meta events (ViewContent, AddToCart, Purchase) must pass
content_idsthat match your catalog item IDs.Google Merchant Center expects a unique
idper offer (often per variant) and anitem_group_idto group variants under one product family.
Two common working patterns:
Variant-based strategy: Catalog/feeds use variant IDs; events use the same variant IDs in
content_ids(Meta) and on Google you send users to variant URLs. Highest precision for size/color.Product-based strategy: Catalog/feeds use product IDs; events use product IDs; you use product-level landing pages for remarketing. Simpler, but less granular.
ID mapping example (choose one strategy and stay consistent):
Shopify object | Meta event param | Google feed field | Example value |
|---|---|---|---|
Variant ID |
|
| 41234567890123 |
Product ID |
|
| 9876543210 |
Tip: Don’t mix product-level content_ids with variant-level id in your feeds. That’s a guaranteed low match rate.
3) Meta setup: catalog, events, and Advantage+ Catalog Ads
Create and verify your catalog in Commerce Manager, then connect the source the Shopify channel manages. Build product sets to segment by availability, price tiers, or collections. In Diagnostics, clear all critical errors and as many warnings as you can before launch; it reduces rendering issues. Meta’s current catalog-based ads are documented in Advantage+ Catalog Ads overview.
Install the Pixel and enable Conversions API (CAPI) via Shopify → Facebook & Instagram by Meta. Choose a data-sharing level that enables server events. In Events Manager, verify that ViewContent/AddToCart/Purchase include content_ids, value, currency, and a shared event_id for browser/server dedup. You should see one counted Purchase when both sources are present. Optional tool-assisted path: a solution like Attribuly can be used to support server-side event delivery and audience syncing, but the native Shopify channel is sufficient for most setups.
QA your Events Manager diagnostics: check Event Match Quality (EMQ), the share of Pixel events covered by CAPI, and overall signal health. Low coverage or double counts usually trace back to missing/rotating event_id or incorrectly scoped server events.
Create your campaign in Ads Manager (Sales objective → Advantage+ Catalog Ads). Select your catalog and, if applicable, product sets. Use your purchase event for optimization and confirm that value signals are flowing. For debugging, use Events Manager → Test events and dataset Overview for payloads/deduplication, and Commerce Manager → Catalog → Diagnostics for item-level errors.
4) Google setup: Merchant Center, tag/GA4, Consent Mode v2, and campaigns
Sync your feed via the Google & YouTube channel in Shopify and clear Merchant Center Diagnostics. Fix “Needs attention” issues—especially mismatched price/availability, missing identifiers, or policy violations—before you launch dynamic remarketing. The canonical spec for retail attributes is here: Google Merchant Center supported attributes.
Link Merchant Center to Google Ads and confirm the correct Merchant Center and feed label in your Ads account. In Merchant Center, ensure the data source has the Dynamic remarketing marketing method enabled per Marketing methods for Merchant Center.
Implement the Google tag and GA4, and publish audiences to Ads. Deploy the Google tag (gtag.js or GTM) and ensure GA4 receives ecommerce events. Link GA4 to Google Ads and enable personalized ads where appropriate so remarketing lists can export. Reference: Get started with advertising in GA4 (linking and audience export).
Turn on Consent Mode v2 sitewide. Set default consent before any tags fire, then update consent after the user’s choice. Verify behavior with Tag Assistant and GA4’s consent reports. Guidance: Set up Consent Mode v2.
Create your campaign: use Performance Max if you want Shopping + remarketing coverage from one system. For pure Display-style dynamic remarketing, create a Display campaign that uses your Merchant Center feed. To debug, use Merchant Center → Products → Needs attention for item-level issues, and Tag Assistant with GA4 DebugView to confirm event parameters and consent state transitions (default denied → granted after acceptance).
5) QA and verification walkthroughs for Shopify DPA retargeting
On Meta, confirm the catalog has no critical errors and key warnings are resolved. In Events Manager, verify content_ids are present, deduplication works (one counted Purchase when Pixel + CAPI fire), and EMQ is healthy.
On Google, ensure products are Approved in Merchant Center with no blocking policy issues and that price/availability match landing pages. In GA4/Google tag, check that events are visible in DebugView, audiences exist and publish to Google Ads, and consent signals look correct in reports.
Finally, run an ID alignment spot check. Pick one product you viewed and confirm the exact ID in the catalog/feed matches the ID in your ViewContent/AddToCart payload. That quick test catches 80% of “ad shows wrong item” complaints.
6) Troubleshooting library: fast causes and fixes
Symptom: Low catalog match rate in Meta; some items render as “not found.” Likely cause: events send product IDs while the catalog uses variant IDs (or vice versa). Missing
content_typecan also reduce matches. Fix: align the ID strategy; confirm the item exists in the catalog with the exact same ID; verify payloads in Events Manager. For extended reading on cross-platform attribution and ID confusion, see Shopify attribution mismatches across platforms.Symptom: Double-counted purchases or “Pixel events covered by CAPI” is low. Likely cause: no shared
event_idbetween browser and server; server event fired late or with missing value/currency. Fix: ensure both copies include the sameevent_id; test in Events Manager; verify your Shopify channel’s Conversions API is enabled.Symptom: Merchant Center disapprovals for price or availability mismatch. Likely cause: landing page currency/structured data not in sync with the feed; dynamic pricing or stock updates lagging. Fix: align the landing page and schema with the feed; consider automatic item updates; reprocess and request review where appropriate per Merchant Center diagnostics guidance.
Symptom: GA4 audiences aren’t populating in Google Ads. Likely cause: GA4 isn’t linked to Ads, personalized ads not enabled, or Consent Mode v2 defaults block ad_personalization. Fix: link GA4 ↔ Ads and enable audience ads features; verify Consent Mode defaults fire before tags and update after choice using GA4’s advertising setup guidance and Consent Mode v2 setup.
7) Launch order and scaling tips
Sequence matters. Connect catalogs/feeds first, fix Diagnostics, then instrument events and consent, then build audiences and campaigns.
A simple rollout: Day 0–1 connect Shopify channels and clear critical feed errors; Day 1–2 verify Meta Pixel + CAPI and GA4 events and confirm ID alignment on a few products; Day 2–3 implement and verify Consent Mode v2, link GA4 → Ads and Merchant Center → Ads, and build seed audiences; Day 3–5 launch Meta Advantage+ Catalog Ads and your Google campaign (Performance Max or Display with feed). Keep budgets modest until Diagnostics stay clean for 3–5 days. If Diagnostics turn red, pause scale and fix upstream. Clean data in, stable delivery out.
References (authoritative, trimmed): Facebook & Instagram by Meta setup guide; Advantage+ Catalog Ads overview; Google Merchant Center supported attributes; Marketing methods for Merchant Center; Get started with advertising in GA4; Set up Consent Mode v2.
Throughout this guide, we used “Shopify DPA retargeting” intentionally—keep that exact phrase in your internal playbooks so your team searches and lands on the right SOP. With correct IDs, consent in place, and clean feeds, Dynamic Product Ads do the heavy lifting for you.