Google Ads Enhanced Conversions Shopify: Step-by-Step 2026 Guide
Step-by-step 2026 guide to set up Google Ads Enhanced Conversions for Shopify — Consent Mode v2, GTM, server-side options, QA and troubleshooting.
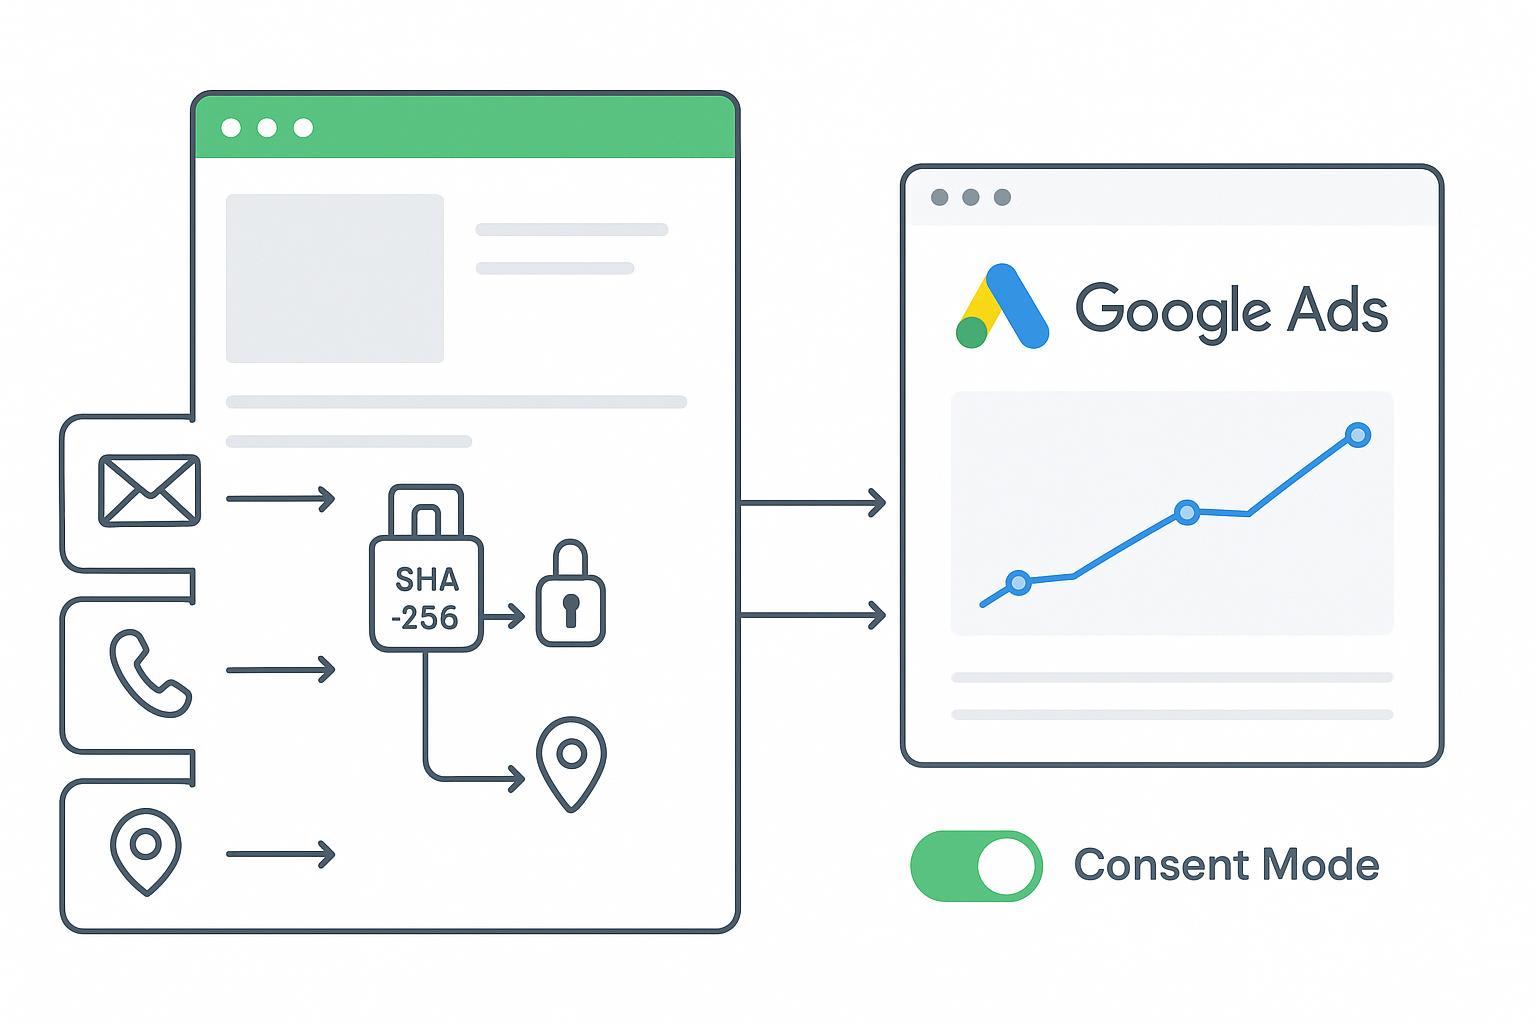
Enhanced Conversions (EC) help Google Ads recover signal by sending hashed, first‑party customer data (such as email or phone) alongside your purchase event. In 2026, with stricter privacy and cookie loss, EC is a practical way for Shopify stores to improve match rates and modeled conversions—provided you implement it with Consent Mode v2 and verify it end‑to‑end. This tutorial walks you through three setup paths (native app, GTM web, and server‑side), the exact sequencing for consent, and a rigorous QA workflow.
Key takeaways
Enhanced Conversions attach normalized, SHA‑256–hashed identifiers to your purchase event to improve match rates and modeling.
You can implement EC via the Shopify Google & YouTube app (fastest), Google Tag Manager on the web (most flexible), or a server‑side path (most resilient).
Consent Mode v2 must be honored before tags fire—specifically ad_storage, analytics_storage, ad_user_data, and ad_personalization.
Verify in Tag Assistant and Google Ads Diagnostics; expect health indicators to stabilize within 24–48 hours after changes.
Most issues boil down to missing consent, incorrect hashing/normalization, or value/currency/transaction_id mismatches.
Quick prerequisites (read this once)
Before you start, make sure you have: a Purchase conversion action in Google Ads with value, currency, and transaction_id configured; access to Shopify order and customer data at purchase confirmation; a plan to normalize and hash identifiers (or let Google handle hashing from normalized inputs); and Consent Mode v2 signals loading before any Google tags. For official setup details and supported identifiers, see Google’s Enhanced Conversions for web documentation in 2026 under setup and user‑provided data guidance.
Reference: Google’s step‑by‑step setup for enhanced conversions for web explains identifiers and tag configuration in detail: Enhanced Conversions for web setup (Google Ads Help).
Reference: Consent Mode v2 policies and parameters (including ad_user_data and ad_personalization) are covered in Google’s official overview: Consent Mode v2 overview (Google Ads Help).
Choose your path: native app, GTM, or server‑side
Here’s the deal: the “right” path depends on your team’s skills and how much flexibility you need.
Shopify Google & YouTube app: Fastest and officially supported. Minimal mapping work, managed Google tag, and an in‑app toggle for Enhanced Conversions. Good default for most merchants. See Shopify and Google’s joint guidance under the Google & YouTube app instructions: Set up the Google & YouTube app for conversions and EC.
Google Tag Manager (web): Best if you need custom data mapping from a data layer, extra identifiers, or granular triggers. Requires careful consent sequencing.
Server‑side (sGTM or partner bridge): Most durable against client‑side blocking, central governance for consent, and clean deduplication using transaction_id. More complex to run. For architecture and tag options, review Google’s server‑side GTM docs: Server‑side Google Ads conversions with sGTM.
Path A — Shopify Google & YouTube app (native)
This is the lowest‑lift option and aligns with Shopify checkout. You enable Enhanced Conversions inside the app and let it manage the Google tag.
Step 1: Install the Google & YouTube app and connect your Google Ads account (not just a manager account). In the app, go to the conversion measurement area and confirm purchase mapping.
Step 2: Turn on Enhanced Conversions in the app’s settings for your Google Ads property. You’ll be prompted to accept customer data terms. This lets the app pass normalized identifiers to Google when consent allows.
Step 3: Ensure Consent Mode v2 is active before any Google tag runs. Load your CMP early and use Shopify’s Customer Privacy APIs so consent states are available to the app’s tag at initialization.
Step 4: Verify. Use Tag Assistant to confirm the purchase event and the presence of a user‑provided data payload; then check Google Ads > Tools > Goals > Conversions > Diagnostics for “Recording enhanced conversions.” Diagnostics guidance is here: Google Ads Diagnostics for conversions.
Notes: If you previously hand‑installed Google tags, review Google’s migration notes to avoid double‑tagging. Keep everything on HTTPS, and make sure value, currency, and transaction_id match your Shopify order totals.
Path B — Google Tag Manager on the web (flexible mapping)
If you need control over which identifiers you send and how they’re normalized, GTM is your friend. Think of GTM as your switchboard: you take a clean purchase event, enrich it with user data (if consented), then wire it into the Google Ads conversion tag with EC enabled.
Step 1: Create a reliable purchase event. On the order status page or via a Web Pixels → dataLayer bridge, push a purchase payload that includes transaction_id, value, and currency. If consent allows, include user‑provided fields such as email, phone, first_name, last_name, street, city, region, country, and postal_code.
Example payload for your dataLayer:
dataLayer.push({
    event: 'purchase',
    transaction_id: '{{order_id}}',
    value: {{order_total}},
    currency: '{{shop_currency}}',
    user_data: {
      email: '{{customer_email}}',
      phone: '{{customer_phone}}',
      first_name: '{{customer_first_name}}',
      last_name: '{{customer_last_name}}',
      street: '{{customer_address1}}',
      city: '{{customer_city}}',
      region: '{{customer_province}}',
      postal_code: '{{customer_zip}}',
      country: '{{customer_country}}'
    }
  });
Step 2: In GTM, create Data Layer Variables for each field. Build a User‑Provided Data variable (Manual configuration) and map the variables to the expected keys (email, phone, address, etc.). In your Google Ads Conversion tag, enable “Include user‑provided data” and select that variable. Ensure the Conversion Linker tag is present.
Step 3: Normalize and hash. Google accepts unhashed inputs and will hash them server‑side, but you must normalize correctly: trim, lowercase, remove extra spaces, format phone numbers to E.164. If you pre‑hash, use SHA‑256 in hex after normalization. The supported identifiers and normalization rules are summarized in Google’s setup guide cited earlier.
Step 4: Consent Mode v2 sequencing. Default consent to denied until users choose. On consent, update the four signals (ad_storage, analytics_storage, ad_user_data, ad_personalization) before the purchase tag fires. This ensures EC is only sent when allowed. See the Consent Mode v2 overview linked above for parameter semantics.
Step 5: Publish and verify in Tag Assistant, confirming the conversion fires on purchase and the user‑provided data parameter is populated when consent is granted. Then monitor Google Ads Diagnostics for health.
Path C — Server‑side (sGTM or partner bridge)
Server‑side tagging routes purchase events through a first‑party subdomain where you control enrichment, consent propagation, and deduplication. It’s more work, but it’s durable.
Step 1: Stand up an sGTM server container on a first‑party subdomain. Add a server‑side Conversion Linker and a GA4 or custom client to receive purchase events from the web container.
Step 2: In the server container, configure a Google Ads Conversion tag and map transaction_id, value, and currency. Include user data only when consent permits; mirror Consent Mode v2 states from client to server.
Step 3: Deduplicate with transaction_id. If you send a client‑side purchase and a server‑side conversion, use the same transaction_id on both so Google can avoid double counting. For architecture and tag options, Google’s server‑side GTM documentation provides the official patterns: Server‑side Google Ads conversions with sGTM.
Step 4: Preview the server container and confirm the Ads tag fires with expected fields, then monitor Diagnostics. Keep an eye on value/currency accuracy, which can cause basket‑data warnings if mismatched.
Consent Mode v2 on Shopify (what matters in 2026)
Consent Mode v2 adds two user‑data signals on top of storage: ad_user_data and ad_personalization. In the EEA, ad_user_data must be respected for measurement, and ad_personalization for personalized ads. Sequence your CMP so consent is known before any Google tag initializes. Then update Consent Mode states at the moment of user action and keep those states available to pixels and tags across pages.
Practical flow: load CMP early; set default denied; on “accept,” update Consent Mode v2 and the Shopify Customer Privacy state; ensure your app/GTM/server tags read those states before firing.
Avoid race conditions by deferring tag initialization until you have a consent decision. This small timing tweak prevents accidental EC payloads in denied states and reduces diagnostics noise.
Verify and QA (don’t skip this)
You’ll validate in two places. First, confirm technical signals on‑site; second, read the health status in Google Ads.
Tag Assistant: Load a real purchase flow in preview mode. On the thank‑you page, confirm the Google Ads conversion tag fires. In the hit details, check that value, currency, and transaction_id match the order and that the user‑provided data parameter is present when consent is granted. If you pre‑hash, confirm the SHA‑256 format (64‑char hex) rather than raw emails.
Google Ads Diagnostics: Go to Tools > Goals > Conversions > your Purchase action > Diagnostics. Healthy states include “Recording enhanced conversions” and no unresolved setup alerts. Allow 24–48 hours after changes for signals to stabilize. For official guidance and what each diagnostic means, review Google’s page: Diagnostics for conversions (Google Ads Help).
Dedup checks: If you run both client and server, pick a few orders and confirm they have one recorded conversion in Ads. Matching transaction_id across paths is the usual fix if you see double counts.
Troubleshooting: fastest fixes first
Missing or denied consent in EEA: If Tag Assistant shows denied ad_user_data or ad_personalization at purchase time, your EC payload won’t be sent. Ensure the CMP loads before tags and that consent updates reach Consent Mode v2 before the conversion fires.
Hashing or normalization errors: Empty or short user‑provided data parameters usually point to unnormalized inputs. Normalize emails to lowercase with no spaces; format phones in E.164; hash with SHA‑256 if pre‑hashing; keep page HTTPS.
Value/currency/transaction_id mismatches: If Diagnostics flags basket‑data issues, verify your dataLayer mapping and Shopify totals. Make sure transaction_id is unique per order.
Duplicate conversions with server‑side: Use the same transaction_id for client and server payloads and confirm only one tag path is configured to count the primary conversion for the Purchase action.
Low volume or delayed health: Diagnostics can take up to 48 hours to show improvements. Keep testing with real orders, then re‑check.
Practical example: server‑side dedup with a partner bridge
Let’s say you keep a lightweight client implementation for UX stability, but you also want durable, server‑side signals. You can send the web purchase event with transaction_id, value, currency, and—if consented—user identifiers. In parallel, a partner bridge posts the same purchase server‑side to Google Ads and deduplicates against the on‑page tag using transaction_id. For example, Attribuly supports a Google Ads integration that can map Shopify order data and user‑provided identifiers to Google Ads while respecting consent and deduplicating via consistent transaction_id. See the integration overview here: Attribuly Google Ads integration.
The operational trick is consistency: same transaction_id on both paths, consent mirrored client → server, and value/currency aligned with Shopify’s source of truth. Validate this loop with Tag Assistant on the client and a server‑side preview for the bridge or sGTM container.
A quick word on Google Ads Enhanced Conversions Shopify keyword usage
When you document your implementation, use consistent naming for your Purchase action and keep “Google Ads Enhanced Conversions Shopify” in internal docs or dashboards if it helps teams connect the dots between platform features and your store stack. It won’t affect measurement, but it does improve team clarity.
Next steps and resources
If you’re net‑new to EC, start with the Shopify Google & YouTube app for the fastest path, then graduate to GTM for flexible mapping.
If you need durability or central governance, pilot a server‑side setup with strict deduplication rules and consent mirroring.
Keep an eye on Diagnostics weekly for the first month after rollout; early fixes save weeks of skewed data.
Authoritative references used in this guide:
Definitions, identifiers, and setup: Enhanced Conversions for web setup (Google Ads Help)
Consent Mode v2 parameters and behavior: Consent Mode v2 overview (Google Ads Help)
Shopify’s native path: Set up the Google & YouTube app for conversions and EC
Server‑side architecture: Server‑side Google Ads conversions with sGTM
Verification: Diagnostics for conversions (Google Ads Help)
Optional reading if you plan a broader server‑side signal strategy: Attribuly Shopify integration overview.
Stay methodical: set consent first, map data clearly, verify twice. Do this well once, and your measurement foundation becomes a smooth workflow rather than a jarring fire drill every release.